SG90 Servo Motor
Module Source
Purchase Link: https://detail.tmall.com/item.htm?abbucket=0&id=615779197448&ns=1&spm=a21n57.1.0.0.6f6f523cXTHwFh
Baidu Netdisk Download Link: https://pan.baidu.com/s/1QsTIKnoQsOTCkeYLLTTjTA?pwd=8889
Password:8889
Specifications
Driving voltage: 3V~7.2V
Driving current:
Working torque: 1.6KG/CM
Control mode: PWM
Rotation angle: 180 degrees
Instructions for Use
When purchasing, you need to distinguish whether your servo can turn 180 degrees, or 360 degrees. 360 degree servos do not control the angle, only the speed of rotation.
The servo speed of the SG90 is not very fast, usually 0.22/60 degrees or 0.18/60 degrees, so if you change the width of the angle control pulse too fast, the servo may not be able to respond. If faster response is required, a higher speed is required.
Hardware Connection

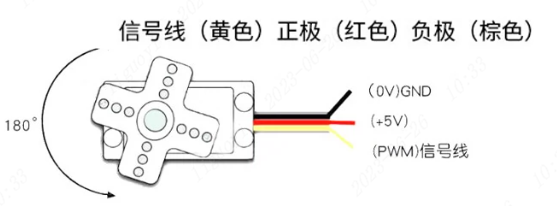
- The signal wire (usually orange or yellow) is connected to the PWM output pin 9 on the development board.
- The power wire (red) is connected to the 5V pin on the development board.
- The ground wire (brown or black) is connected to the GND pin on the development board.
Usage Method
- Include the Servo library: First, include the Servo library in the Arduino IDE.
- Define a Servo object: Then, define one or more Servo objects, with each object representing a servo motor.
- Attach the servo to a pin: Use the attach() function to attach the servo object to the pin connected to the control signal line.
- Control the servo: Use the write() function to rotate the servo to a specified angle (from 0 to 180 degrees).
#include <Servo.h>

Servo myservo;  // 创建舵机对象来控制SG90

void setup() {
  myservo.attach(9);  // 将舵机的信号线连接到数字引脚9
}

void loop() {
  for (int pos = 0; pos <= 180; pos += 1) {
    myservo.write(pos);              // 从0度转到180度
    delay(15);                       // 舵机转到新位置需要一些时间
  }
  for (int pos = 180; pos >= 0; pos -= 1) {
    myservo.write(pos);              // 从180度回转到0度
    delay(15);                       // 舵机转到新位置需要一些时间
  }
}2
3
4
5
6
7
8
9
10
11
12
13
14
15
16
17
18
This example code makes the servo slowly rotate from 0 degrees to 180 degrees, and then slowly return back to 0 degrees. The delay(15) statement ensures that the servo has enough time to reach the new position.