1 本节介绍
📝本节您将学习如何将摄像头采集到的画面进行添加文字或图形,比如说再寻色块中指示色块坐标,再AI例程中筐出目标位置
🏆学习目标
1️⃣如何在自己创建的图像上绘制各种形状和文字。
2️⃣如何在摄像头采集到的画面上添加各种文字或图形。
2 图像绘制的作用
引入图像绘制的主要目的是出于以下几点:
- 调试和可视化:通过在图片上绘制图形(如框、线、圆等)和文字,我们可以直观地看到算法的效果和问题所在。将分析结果(比如物体检测框、测量值、追踪轨迹等)直接叠加到图像上,可以提高结果的可理解性,便于操作和检查。
- 数据标注:我们可以直接在图片上标注相关信息(类别,坐标等)有助于数据整理和后续分析,在图像中绘制瑕疵区域或标记异常点。
- 简单的用户界面:通过绘图和写字功能,可以实时向用户展示系统状态、统计信息或其他反馈内容。比如创建一个触摸区域或显示一个系统时间。
3 图像绘制使用指南
3.1 概述
OpenMV 是一个小型嵌入式机器视觉模块,广泛用于快速开发计算机视觉应用。OpenMV 的图像绘制方法可以用于在图像上绘制各种形状和文字,以便进行视觉反馈和调试。
CanMV支持OpenMV的图像绘制方法,并增加了一些,如绘制中文字符串的draw_string_advanced
3.2 常用函数
3.2.1 draw_string_advanced
draw_string_advanced 函数使用freetype渲染文字,支持中文,用户也可指定字体
- 语法
python
image.draw_string_advanced(x,y,char_size,str,[color, font])1
参数解释
x, y起点坐标。char_size:字符大小str:需要绘制的中文字符color:字的颜色。font: 字体文件路径
示例
python
img.draw_string_advanced(10, 10, 32, "你好世界", color=(255, 0, 0)) # 绘制红色线1
3.2.2 draw_line
draw_line 函数可实现在图像上绘制一条线。
- 语法
python
image.draw_line(x0, y0, x1, y1, color)1
参数解释
x0, y0:起点坐标。x1, y1:终点坐标。color:线的颜色。
示例
python
img.draw_line(10, 10, 100, 100, color=(255, 0, 0)) # 绘制红色线1
3.2.3 draw_rectangle
draw_rectangle 函数可实现在图像上绘制一个矩形。
- 语法
python
image.draw_rectangle(x, y, w, h, color, thickness=1)1
参数解释
x, y:矩形的左上角坐标。w, h:矩形的宽度和高度。color:矩形的颜色。thickness:矩形边框的厚度(默认为1)。
示例
python
img.draw_rectangle(20, 20, 50, 30, color=(0, 255, 0), thickness=2) # 绘制绿色矩形1
3.2.4 draw_circle
draw_circle函数可实现在图像上绘制一个圆。
- 语法
python
image.draw_circle(x, y, r, color, thickness=1)1
参数解释
x, y:圆心坐标。r:圆的半径。color:圆的颜色。thickness:圆边框的厚度(默认为1)。
示例
python
img.draw_circle(60, 60, 30, color=(0, 0, 255), thickness=3) # 绘制蓝色圆1
2
2
3.2.5 draw_cross
draw_cross函数可实现在图像上绘制一个十字交叉。
- 语法
python
image.draw_cross(x, y, color, size=5, thickness=1)1
参数解释
x, y:交叉点坐标。color:交叉的颜色。size:交叉的大小(默认为5)。thickness:交叉线条的厚度(默认为1)。
示例
python
img.draw_cross(40, 40, color=(255, 255, 0), size=10, thickness=2) # 绘制黄色交叉1
2
2
3.2.6 draw_arrow
draw_arrow函数可实现在图像上绘制一条箭头线。
- 语法
python
image.draw_arrow(x0, y0, x1, y1, color, thickness=1)1
参数解释
x0, y0:起点坐标。x1, y1:终点坐标。color:箭头的颜色。thickness:箭头线条的厚度(默认为1)。
示例
python
img.draw_arrow(10, 10, 100, 100, color=(255, 0, 0), thickness=2) # 绘制红色箭头1
3.2.7 draw_ellipse
draw_ellipse函数可实现在图像上绘制一个椭圆。
- 语法
python
image.draw_ellipse(cx, cy, rx, ry, color, thickness=1)1
参数解释
cx, cy:椭圆中心的坐标。rx, ry:椭圆的半径(x轴和y轴方向)。color:椭圆的颜色。thickness:椭圆边框的厚度(默认为1)。
示例
python
img.draw_ellipse(60, 60, 30, 20, color=(0, 0, 255), thickness=3) # 绘制蓝色椭圆1
3.2.8 draw_image
draw_image函数可实现在当前图像上绘制另一个图像。
- 语法
python
image.draw_image(img, x, y, alpha=128, scale=1.0)1
参数解释
img:要绘制的图像对象。x, y:绘制位置的左上角坐标。alpha:透明度(0-256)。scale:缩放比例(默认为1.0)。
示例
python
  overlay = image.Image("overlay.bmp")
  img.draw_image(overlay, 10, 10, alpha=128, scale=1.0)  # 在(10, 10)位置绘制 overlay.bmp
1
2
2
3.2.9 draw_keypoints
draw_keypoints函数可实现在图像上绘制关键点。
- 语法
python
image.draw_keypoints(keypoints, size=10, color, thickness=1)1
参数解释
keypoints:关键点列表,每个关键点是一个(x, y)元组。size:关键点的大小(默认为10)。color:关键点的颜色。thickness:关键点边框的厚度(默认为1)。
示例
python
keypoints = [(30, 30), (50, 50), (70, 70)]
img.draw_keypoints(keypoints, size=10, color=(255, 255, 0), thickness=2)  # 绘制黄色关键点
1
2
2
3.2.10 flood_fill
flood_fill函数可实现在图像上执行洪水填充算法,从指定的起点开始填充指定的颜色。
- 语法
python
image.flood_fill(x, y, color, threshold, invert=False, clear_background=False)1
参数解释
x, y:起点坐标。color:填充的颜色。threshold:填充阈值,表示起点像素与相邻像素颜色的允许差异范围。invert:布尔值,如果为 True,则反转填充条件。clear_background:布尔值,如果为 True,则清除填充区域以外的背景。
示例
python
img.flood_fill(30, 30, color=(255, 0, 0), threshold=30, invert=False, clear_background=False) # 从(30, 30)开始填充红色1
3.2.11 draw_string
draw_string函数可实现在图像上绘制字符串。
- 语法
python
image.draw_string(x, y, text, color, scale=1)1
参数解释
x, y:字符串的起始坐标。text:要绘制的字符串内容。color:字符串的颜色。scale:字符串的缩放比例(默认为1)。
示例
python
img.draw_string(10, 10, "Hello OpenMV", color=(255, 255, 255), scale=2) # 绘制白色字符串1
4 在自己创建图像上进行绘制
python
import time, os, gc, sys, urandom

from media.display import *
from media.media import *

try:
    # 显示模式选择:可以是 "VIRT"、"LCD" 或 "HDMI"
    DISPLAY_MODE = "LCD"

    # 根据模式设置显示宽高
    if DISPLAY_MODE == "VIRT":
        # 虚拟显示器模式
        DISPLAY_WIDTH = ALIGN_UP(1920, 16)
        DISPLAY_HEIGHT = 1080
    elif DISPLAY_MODE == "LCD":
        # 3.1寸屏幕模式
        DISPLAY_WIDTH = 800
        DISPLAY_HEIGHT = 480
    elif DISPLAY_MODE == "HDMI":
        # HDMI扩展板模式
        DISPLAY_WIDTH = 1920
        DISPLAY_HEIGHT = 1080
    else:
        raise ValueError("未知的 DISPLAY_MODE,请选择 'VIRT', 'LCD' 或 'HDMI'")

    # 根据模式初始化显示器
    if DISPLAY_MODE == "VIRT":
        Display.init(Display.VIRT, width=DISPLAY_WIDTH, height=DISPLAY_HEIGHT, fps=60)
    elif DISPLAY_MODE == "LCD":
        Display.init(Display.ST7701, width=DISPLAY_WIDTH, height=DISPLAY_HEIGHT, to_ide=True)
    elif DISPLAY_MODE == "HDMI":
        Display.init(Display.LT9611, width=DISPLAY_WIDTH, height=DISPLAY_HEIGHT, to_ide=True)

    width = DISPLAY_WIDTH
    height = DISPLAY_HEIGHT

    # 初始化媒体管理器
    MediaManager.init()

    fps = time.clock()
    # 创建绘制的图像
    img = image.Image(width, height, image.ARGB8888)

    # 动态变化的颜色生成器
    def random_color():
        return (urandom.getrandbits(8), urandom.getrandbits(8), urandom.getrandbits(8))

    # 动态大小生成器
    def random_size(max_size):
        return urandom.getrandbits(10) % max_size

    while True:
        fps.tick()
        # 检查是否在退出点
        os.exitpoint()
        img.clear()

        # 绘制红色线
        img.draw_line(10, 10, 100, 100, color=(255, 0, 0))

        # 绘制绿色矩形
        img.draw_rectangle(20, 20, 50, 30, color=(0, 255, 0), thickness=2)

        # 绘制蓝色圆
        img.draw_circle(30, 30, 30, color=(0, 0, 255), thickness=3)

        # 绘制黄色交叉
        img.draw_cross(40, 40, color=(255, 255, 0), size=10, thickness=2)

        # 绘制红色字符串
        img.draw_string_advanced(50, 50, 32, "你好庐山派", color=(255, 0, 0))
        # 绘制白色字符串
        img.draw_string_advanced(50, 100, 32, "Hello CanMV", color=(255, 255, 255), scale=2)

        # 绘制红色箭头
        img.draw_arrow(60, 60, 100, 100, color=(255, 0, 0), thickness=2)

        # 绘制蓝色椭圆
        radius_x = urandom.getrandbits(30) % (max(img.height(), img.width())//2)
        radius_y = urandom.getrandbits(30) % (max(img.height(), img.width())//2)
        rot = urandom.getrandbits(30)
        img.draw_ellipse(70, 70, radius_x, radius_y, rot, color = (0, 0, 255), thickness = 2, fill = False)

        # 绘制黄色关键点
        keypoints = [(30, 30), (50, 50), (70, 70)]
        img.draw_keypoints([(30, 40, rot)], color = (255, 255, 0), size = 20, thickness = 2, fill = False)

        # 动态线条绘制
        for _ in range(2):
           x0, y0 = urandom.getrandbits(10) % width, urandom.getrandbits(10) % height
           x1, y1 = urandom.getrandbits(10) % width, urandom.getrandbits(10) % height
           img.draw_line(x0, y0, x1, y1, color=random_color(),thickness=2)

        # 椭圆动态变化
        for _ in range(5):
            x, y = urandom.getrandbits(10) % width, urandom.getrandbits(10) % height
            img.draw_cross(x, y, color=random_color(), size=10, thickness=1)

        # 动态箭头
        for _ in range(3):
            x0, y0 = urandom.getrandbits(10) % width, urandom.getrandbits(10) % height
            x1, y1 = urandom.getrandbits(10) % width, urandom.getrandbits(10) % height
            img.draw_arrow(x0, y0, x1, y1, color=random_color(), thickness=5)

        # 动态洪水填充
        fx, fy = urandom.getrandbits(10) % width, urandom.getrandbits(10) % height
        img.flood_fill(fx, fy, color=random_color(), threshold=30)

        # 显示绘制结果
        Display.show_image(img)

        #print(fps.fps())

        time.sleep_ms(10)
except KeyboardInterrupt as e:
    print(f"user stop")
except BaseException as e:
    print(f"Exception '{e}'")
finally:
    # 销毁 display
    Display.deinit()

    os.exitpoint(os.EXITPOINT_ENABLE_SLEEP)
    time.sleep_ms(100)

    # 释放媒体缓冲区
    MediaManager.deinit()
1
2
3
4
5
6
7
8
9
10
11
12
13
14
15
16
17
18
19
20
21
22
23
24
25
26
27
28
29
30
31
32
33
34
35
36
37
38
39
40
41
42
43
44
45
46
47
48
49
50
51
52
53
54
55
56
57
58
59
60
61
62
63
64
65
66
67
68
69
70
71
72
73
74
75
76
77
78
79
80
81
82
83
84
85
86
87
88
89
90
91
92
93
94
95
96
97
98
99
100
101
102
103
104
105
106
107
108
109
110
111
112
113
114
115
116
117
118
119
120
121
122
123
124
125
126
127
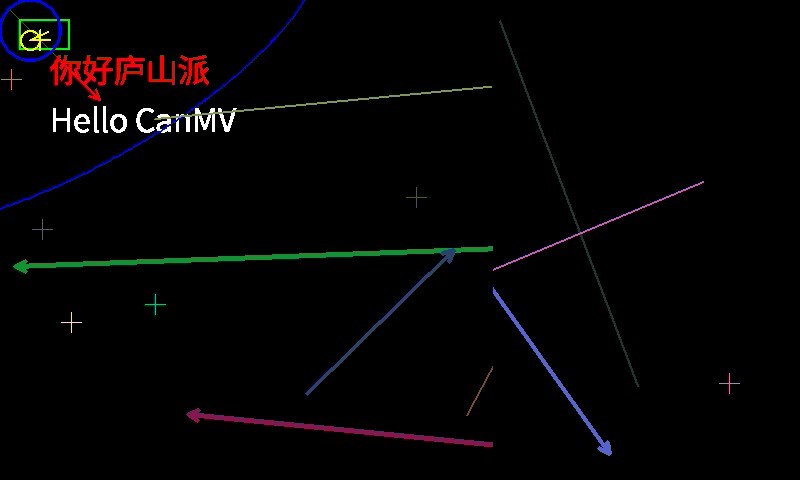
我这里显示设备使用的是3.1寸屏幕扩展板,显示界面如下图所示: 
5 在摄像头采集到的画面上绘制
python
# 立创·庐山派-K230-CanMV开发板资料与相关扩展板软硬件资料官网全部开源
# 开发板官网:www.lckfb.com
# 技术支持常驻论坛,任何技术问题欢迎随时交流学习
# 立创论坛:www.jlc-bbs.com/lckfb
# 关注bilibili账号:【立创开发板】,掌握我们的最新动态!
# 不靠卖板赚钱,以培养中国工程师为己任

import time, os, sys

from media.sensor import *
from media.display import *
from media.media import *

sensor_id = 2
sensor = None

# 显示模式选择:可以是 "VIRT"、"LCD" 或 "HDMI"
DISPLAY_MODE = "LCD"

# 根据模式设置显示宽高
if DISPLAY_MODE == "VIRT":
    # 虚拟显示器模式
    DISPLAY_WIDTH = ALIGN_UP(1920, 16)
    DISPLAY_HEIGHT = 1080
elif DISPLAY_MODE == "LCD":
    # 3.1寸屏幕模式
    DISPLAY_WIDTH = 800
    DISPLAY_HEIGHT = 480
elif DISPLAY_MODE == "HDMI":
    # HDMI扩展板模式
    DISPLAY_WIDTH = 1920
    DISPLAY_HEIGHT = 1080
else:
    raise ValueError("未知的 DISPLAY_MODE,请选择 'VIRT', 'LCD' 或 'HDMI'")

try:
    # 构造一个具有默认配置的摄像头对象
    sensor = Sensor(id=sensor_id)
    # 重置摄像头sensor
    sensor.reset()

    # 无需进行镜像翻转
    # 设置水平镜像
    # sensor.set_hmirror(False)
    # 设置垂直翻转
    # sensor.set_vflip(False)

    # 设置通道0的输出尺寸为1920x1080
    sensor.set_framesize(width=DISPLAY_WIDTH, height=DISPLAY_HEIGHT, chn=CAM_CHN_ID_0)
    # 设置通道0的输出像素格式为RGB888
    sensor.set_pixformat(Sensor.RGB888, chn=CAM_CHN_ID_0)

    # 根据模式初始化显示器
    if DISPLAY_MODE == "VIRT":
        Display.init(Display.VIRT, width=DISPLAY_WIDTH, height=DISPLAY_HEIGHT, fps=60)
    elif DISPLAY_MODE == "LCD":
        Display.init(Display.ST7701, width=DISPLAY_WIDTH, height=DISPLAY_HEIGHT, to_ide=True)
    elif DISPLAY_MODE == "HDMI":
        Display.init(Display.LT9611, width=DISPLAY_WIDTH, height=DISPLAY_HEIGHT, to_ide=True)

    # 初始化媒体管理器
    MediaManager.init()
    # 启动传感器
    sensor.run()

    while True:
        os.exitpoint()

        # 捕获通道0的图像
        img = sensor.snapshot(chn=CAM_CHN_ID_0)

        # 绘制内容
        # 1. 绘制绿色矩形
        img.draw_rectangle(20, 20, 100, 50, color=(0, 255, 0), thickness=5)
        # 2. 绘制红色圆形
        img.draw_circle(200, 150, 50, color=(255, 0, 0), thickness=3)
        # 3. 绘制蓝色线条
        img.draw_line(300, 50, 400, 200, color=(0, 0, 255), thickness=2)
        # 4. 绘制黄色字符串
        img.draw_string_advanced(50, 100, 32,"你好, 立创·庐山派K230-CanMV开发板!", color=(255, 255, 0), scale=2)
        # 5. 绘制十字交叉点
        img.draw_cross(400, 240, color=(255, 255, 255), size=20, thickness=2)

        # 显示捕获的图像
        Display.show_image(img)

except KeyboardInterrupt as e:
    print("用户停止: ", e)
except BaseException as e:
    print(f"异常: {e}")
finally:
    # 停止传感器运行
    if isinstance(sensor, Sensor):
        sensor.stop()
    # 反初始化显示模块
    Display.deinit()
    os.exitpoint(os.EXITPOINT_ENABLE_SLEEP)
    time.sleep_ms(100)
    # 释放媒体缓冲区
    MediaManager.deinit()
1
2
3
4
5
6
7
8
9
10
11
12
13
14
15
16
17
18
19
20
21
22
23
24
25
26
27
28
29
30
31
32
33
34
35
36
37
38
39
40
41
42
43
44
45
46
47
48
49
50
51
52
53
54
55
56
57
58
59
60
61
62
63
64
65
66
67
68
69
70
71
72
73
74
75
76
77
78
79
80
81
82
83
84
85
86
87
88
89
90
91
92
93
94
95
96
97
98
99
100
2
3
4
5
6
7
8
9
10
11
12
13
14
15
16
17
18
19
20
21
22
23
24
25
26
27
28
29
30
31
32
33
34
35
36
37
38
39
40
41
42
43
44
45
46
47
48
49
50
51
52
53
54
55
56
57
58
59
60
61
62
63
64
65
66
67
68
69
70
71
72
73
74
75
76
77
78
79
80
81
82
83
84
85
86
87
88
89
90
91
92
93
94
95
96
97
98
99
100
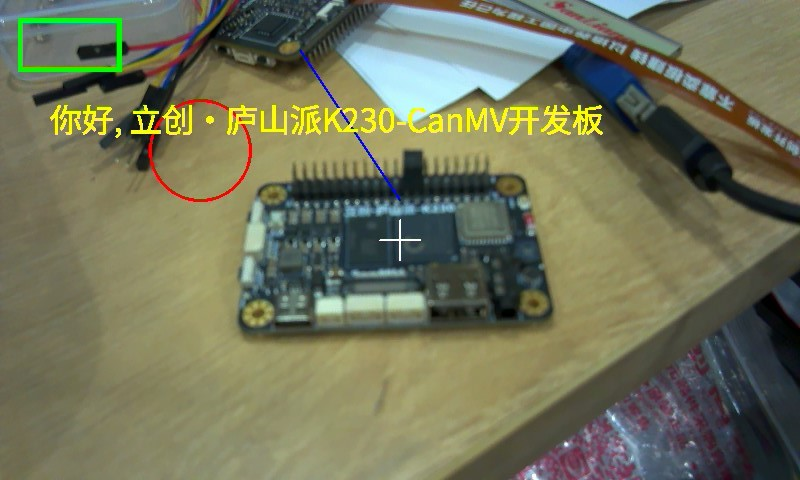
我这里显示设备使用的是3.1寸屏幕扩展板,显示界面如下图所示:
