What is TF Card Boot
In the previous chapters, we introduced how to flash the system image into the development board's eMMC storage to achieve system boot and operation. However, sometimes we may want to boot the system from a TF card (also known as MicroSD card), which is particularly convenient during development and testing.
The basic principle of TF card boot is to write the system image to the TF card, allowing it to read the boot files and system from the TF card. This way, we can easily replace and test different system images without having to flash to eMMC every time.
Boot Order Description
In the RK3576 boot order, eMMC has higher priority than TF card.
This means if there is a valid boot image in the eMMC, the development board will boot from eMMC first and will not attempt to boot from the TF card.
Therefore, to boot from TF card, you must ensure there is no valid boot image in the eMMC. This can be achieved by the following method:
Use flashing tool to erase eMMC image:
Refer to Finished Image Flashing or Distributed Image Flashing in the previous chapters. After connecting the development board with the flashing tool, select the eMMC erase function and complete the process.

Download SDDiskTool
Go to Download Center 🚀 and enter the network disk. Download the Development Tools/SDDiskTool_v1.78.zip archive and extract it.
Create TF Boot Card
Double-click SD_Firmware_Tool.exe to open the software. Connect the TF card to the computer via a card reader, and the software will automatically detect the TF card, as shown in the figure:
Select this TF card as the target device, check the [SD Boot] option, then click the [Firmware] button and select the system .img image to write.
Note: The selected image must be a finished image! For detailed concepts, refer to the previous chapter Finished Image Flashing.
Select this TF card as the target device, then click the [Firmware] button and select the system .img image to write.
The demo image selected here is the Android14 finished image downloaded from the Download Center 🚀.
Wait for the writing to complete:
In this way, we have successfully written the system image to the TF card, creating the TF card boot disk.
Testing
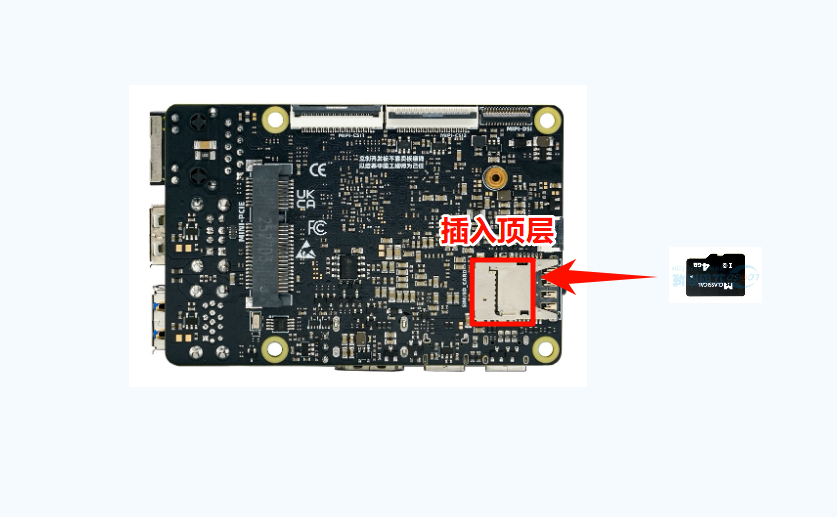
Insert the prepared TF card into the development board's TF card slot. Ensure the eMMC has been erased and contains no valid images, then power on the development board:
Our TF card slot is located on the back of the board, alongside the SIM card slot (one above, one below - TF card on top, SIM card on bottom):