Why Use Samba
When compiling the SDK in VMware virtual machine, you often need to transfer files between Windows and Ubuntu. Samba allows the Ubuntu virtual machine's directory to be directly mapped to Windows File Explorer as a network share. This lets users access files in the Ubuntu virtual machine from Windows as if they were on a local disk.
Main use cases:
- Image flashing: Compiled
.imgand other image files are usually generated in the virtual machine. After sharing via Samba, they can be directly read by flashing tools on Windows without manually copying images to Windows. - Archive downloading: Large SDK archives downloaded from network drives can be directly downloaded to the virtual machine's mapped network drive via Samba sharing, which is equivalent to directly downloading to the virtual machine without manual copying.
- Source code editing: You can use familiar editors on Windows (like VS Code, Notepad++, etc.) to directly open source code in the virtual machine for editing. After saving, you can immediately compile in the virtual machine (file editing recommended with
SSH + VSCode). - File backup: Compiled products, log files, etc. can be accessed and backed up from the Windows side at any time without having to transfer via SSH every time.
Compared to VMware's built-in shared folder feature, Samba has better compatibility and is more stable and reliable.
Start the Virtual Machine
Install Samba
Update package list:
sudo apt updateInstall Samba:
sudo apt install samba smbclient -yCheck if Samba was installed successfully:
samba --versionIf you see the Samba version number output, the installation was successful.
Create a shared directory for Samba in your home directory:
mkdir -p ~/share
chmod -R 0777 ~/shareConfigure Samba
Write configuration (use tee command to append content to the end of /etc/samba/smb.conf):
echo "
[ubuntu22-share-folder]
	comment = share folder
	browseable = yes
	path = /home/lckfb/share
	valid users = lckfb, lckfb
	write list = lckfb, lckfb
	inherit owner = yes
	browsable = yes
	admin users = lckfb, lckfb
	public = yes
	writable = yes
	create mask = 0755
	read only = No
	directory mode = 0755

" | sudo tee -a /etc/samba/smb.confParameter Description
ubuntu22-share-folder: Share name, can be customizedpath: Shared directory path, must match the directory created earliervalid users: Users allowed to access, must match the current logged-in userwrite list: Users allowed to write, must match the current logged-in useradmin users: Admin users, must match the current logged-in usercreate mask: Permission mask for created files, generally set to0755directory mode: Permission mask for created directories, generally set to0755writable: Whether to allow writing, set toyesto allow writingread only: Whether to read-only, set toNoto allow read/writebrowsable: Whether to allow browsing, set toyesto allow browsingpublic: Whether to allow public access, set toyesto allow public accesscomment: Share description, can be customized
If you are not sure, you can use cat /etc/samba/smb.conf to view the configuration file content and confirm the configuration was written successfully.
Set Samba User Password
Set Samba access password for the current user:
sudo smbpasswd -a lckfbEnter the password twice (can be the same as the login password). After completion, you will see the Added user prompt:
Later, when you log in to the mapped folder in Windows, the username is lckfb and the password is the one you just set.
After everything is done, restart the Samba service to make the configuration take effect:
sudo systemctl restart smbdMap Network Drive in Windows
Open This PC in Windows, right-click Network, and select Map Network Drive:
Select a drive letter, then enter \\Virtual Machine IP Address\Virtual Machine Samba Share Name in the folder field. For example:
The virtual machine samba share name is
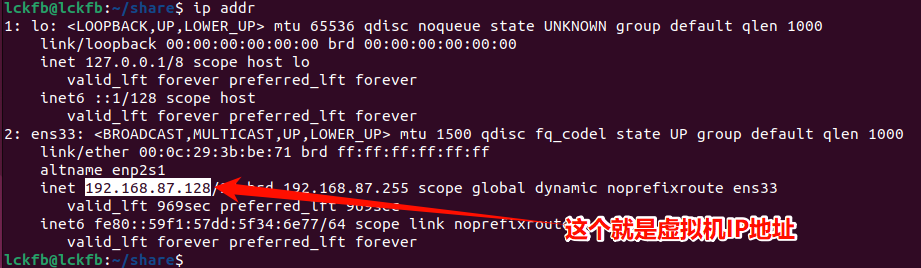
[ubuntu22-share-folder]configured in/etc/samba/smb.confearlier. The virtual machine IP address can be checked with theip addrcommand.
Then it will ask for username and password. Enter the samba username and samba password you set earlier.
A window like this will open, indicating the mapping was successful:
Test
Create a test file in the mapped drive in Windows and write some content to it:
Then go back to the Ubuntu virtual machine, enter the samba shared directory, and check if you can see the test file you just created:
So far, our Samba setup is complete. You can now happily transfer files between Windows and Ubuntu virtual machine!
Precautions and Common Issues
- Firewall settings: Make sure the Ubuntu virtual machine's firewall allows access to Samba-related ports (such as 137-139, 445). Otherwise, Windows may not be able to connect to the share.
- Permission issues: The permissions on the Samba shared directory must be set correctly. Ensure Windows users have read/write permissions. Otherwise, they may not be able to access or modify files.
- Network configuration: It is recommended to use "Bridge Mode" for the virtual machine's network mode. This ensures the virtual machine and host are on the same LAN for easy access.
- Samba service status: If you cannot access the share, check if the Samba service is running. You can use
sudo systemctl status smbdto view the status. - Username and password: When connecting to a Samba share, you need to use the correct username and password. Make sure the corresponding user has been added in the Samba configuration.
lock-frontend error when using apt install
If you encounter the Could not get lock /var/lib/dpkg/lock-frontend error when installing Samba, it means another package management process is running.
A common solution is to wait a while and try again later. If you are in a hurry, you can try the following method (kill the process):
sudo kill -9 2277