
我们也知道cpu需要通过i2c adapter的方法与i2c client进行通信。而i2c模块也为此抽象出了cpu与i2c client通信的接口,分别为:
i2c_transfer
i2c_smbus_xfer
这两个接口分别对应了i2c、smbus的通信接口,而这两个接口也就是分别调用
i2c_adapter->master_xfer
i2c_adapter->smbus_xfer。
一、i2c_master_recv
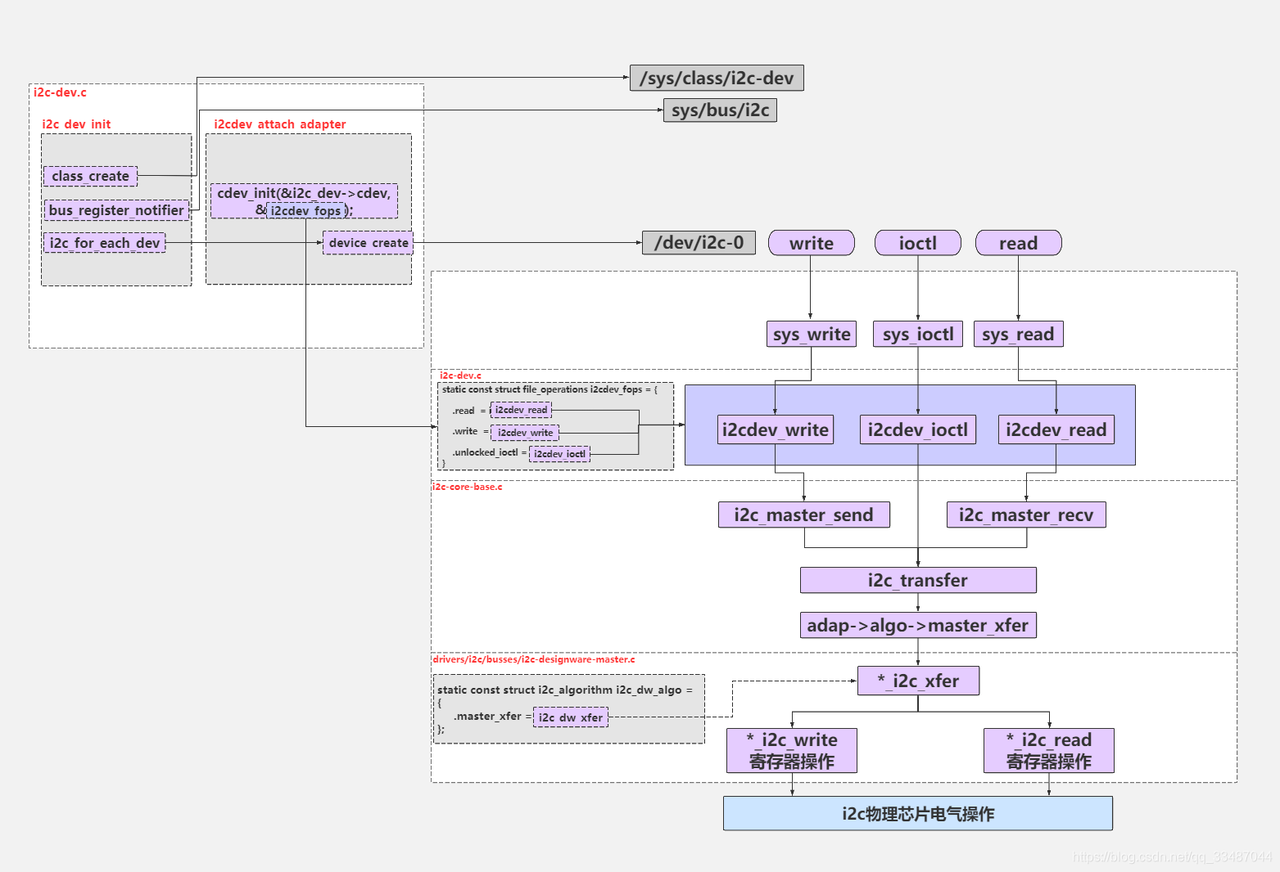
在I2C数据传输中,主要涉及三个函数:i2c_master_send、i2c_master_recv 和 i2c_transfer。其中前两个函数(发送和接收)是I2C核心层提供的基础读写接口。它们的主要作用是:
生成符合I2C协议的时序和数据帧;
通过对应的I2C适配器驱动程序,实际执行总线上的数据传输操作。
这两个函数定义在头文件 include/linux/i2c.h 中。
static inline int i2c_master_recv(const struct i2c_client *client,
char *buf, int count)
{
    return i2c_transfer_buffer_flags(client, buf, count, I2C_M_RD);
};

static inline int i2c_master_send(const struct i2c_client *client,
const char *buf, int count)
{
    return i2c_transfer_buffer_flags(client, (char *)buf, count, 0);
};可以看到两个函数都是调用的 i2c_transfer_buffer_flags 函数, 该函数定义在“drivers/i2c/i2c-core-base.c” 文件中, 具体内容如下所示:
int i2c_transfer_buffer_flags(const struct i2c_client *client, char *buf,
int count, u16 flags)
{
  int ret; // 保存传输结果

  // 构建 i2c_msg 结构体,描述本次传输操作
  struct i2c_msg msg = {
    .addr = client->addr, // 设置从设备地址
    // 设置传输标志位,包括用户传入的标志位和客户端对象自身的标志位
    .flags = flags | (client->flags & I2C_M_TEN),
    .len = count, // 设置传输数据长度
    .buf = buf, // 设置数据缓冲区
  };
  // 调用 i2c_transfer 函数进行数据传输
  // 该函数会根据传输的消息数量返回实际传输成功的消息数量
  ret = i2c_transfer(client->adapter, &msg, 1);

  /*
  * 如果传输成功(即传输了 1 条消息),返回传输的字节数;
  * 否则返回错误码。
  */
  return (ret == 1) ? count : ret;
}I2C数据传输主要通过i2c_transfer函数实现。具体来说:
当调用i2c_transfer_buffer_flags时,程序会先创建一个数据结构i2c_msg,里面包含设备地址、传输参数、数据大小和缓冲区等信息。
然后这个函数会把准备好的数据交给i2c_transfer来实际执行传输操作。
::: 需要特别说明的是: i2c_master_send和i2c_master_recv这两个常用函数,本质上都是通过调用i2c_transfer来完成工作的。不过在后续实验中,我们不会直接使用这两个函数,而是直接编写基于i2c_transfer的代码来实现I2C的发送和接收功能。
总结来说,这两个函数其实都是通过i2c_transfer来实现的,而实际操作时我们会直接使用底层的i2c_transfer函数来编写代码。 :::
二、i2c_transfer
i2c_transfer 函数定义在“drivers/i2c/i2c-core-base.c” 文件中, 具体内容如下所示:
i2c_transfer函数的三个参数说明如下:
(1)struct i2c_adapter *adap:指定要使用的I2C适配器。每个I2C控制器对应一个适配器结构体,里面保存了该适配器的所有必要信息和操作方法。
(2)struct i2c_msg *msgs:指向一个消息列表,用来指定要发送或接收的一条或多条I2C消息。每个消息包含设备地址、数据内容等传输所需的信息。
(3)int num:表示消息列表中的消息数量,告诉函数需要处理多少条消息。
struct i2c_msg {
  __u16 addr; // 从设备的 7 位地址
  __u16 flags; // 消息标志位
#define I2C_M_RD 0x0001 // 表示读操作,必须是 0x0001
#define I2C_M_TEN 0x0010 // 使用 10 位从设备地址,需要 I2C_FUNC_10BIT_ADDR 支持
#define I2C_M_DMA_SAFE 0x0200 // 表示数据缓冲区是安全的(仅在内核空间使用)
#define I2C_M_RECV_LEN 0x0400 // 表示在读操作中需要接收可变长度的数据
#define I2C_M_NO_RD_ACK 0x0800 // 表示不需要在读操作后接收 ACK
#define I2C_M_IGNORE_NAK 0x1000 // 表示即使收到 NAK 也要继续传输
#define I2C_M_REV_DIR_ADDR 0x2000// 表示地址字节需要反转,
#define I2C_M_NOSTART 0x4000 // 表示不需要发送起始条件
#define I2C_M_STOP 0x8000 // 表示在消息传输后需要发送停止条
  __u16 len; // 要传输的数据长度(字节数)
  __u8 *buf; // 指向要传输的数据缓冲区
};注: 在该结构体中没有写操作, 根据 i2c_master_send 函数可以得到 0 为写操作。