
📢Linux 上有一些典型的问题分析手段,从这些基本的分析方法入手,你可以一步步判断出问题根因。这些分析手段,可以简单地归纳为下图:
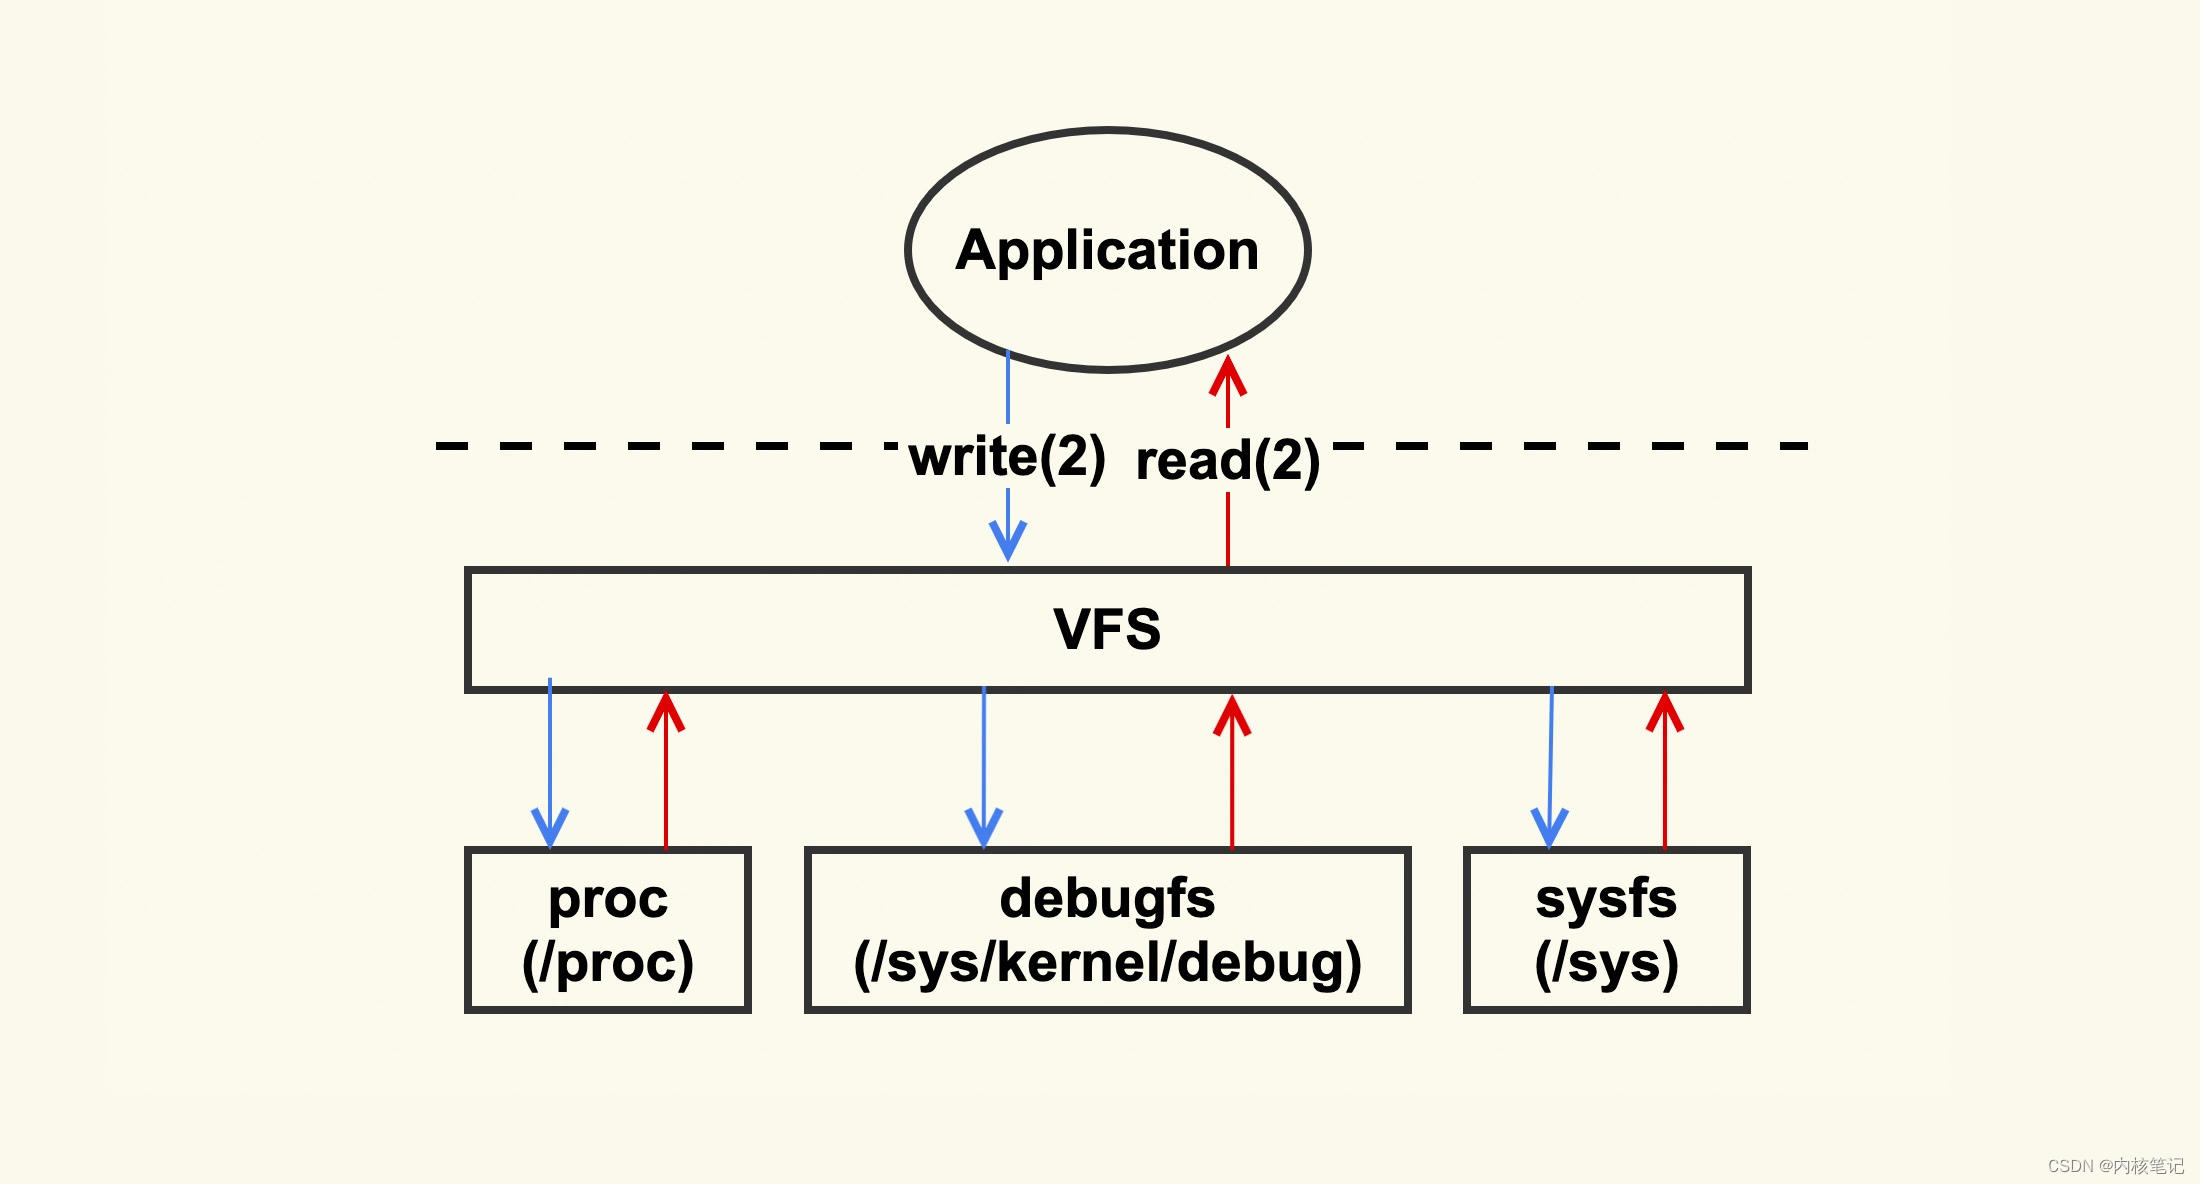
Linux内核主要通过/proc、/debugfs和/sys这三个目录将系统信息提供给用户。遇到问题原因不明确时,可以去这几个目录查看数据,找出异常指标。
一、debugfs使用案例
Debugfs是内核开发者用来在用户空间查看信息的简便工具。它和proc文件系统不同——proc只显示进程相关的信息;也不同于sysfs文件系统,后者要求每个文件必须对应一个明确的值。而debugfs没有任何限制,开发者可以自由地在这里存放任何想要展示的信息。
二、enable debugfs
让内核支持DEBUGFS,使能宏CONFIG_DEBUG_FS,在内核配置中选中,一般是在Kernel hacking中
Kernel Hacking --->[] Debug Filesystem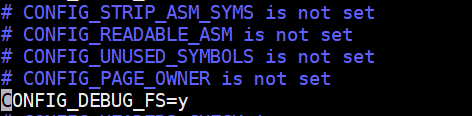
debugfs 挂载在 “/sys/kernel/debug” 目录下, 如果没有挂载, 可以使用如下命令来挂载或者添加到 fstab 中来自动挂载
mount -t debugfs none /sys/kernel/debug
三、debugfs API
要使用debugfs提供的api必须包含头文件 “<linux/debugfs.h>”
debugfs 提供如下的API
3.1、创建目录
/* 在 debugfs 中建立一个目录, 如果parent为NULL, 则在debugfs的根目录即 /sys/kernel/debug 中建立目录 */
struct dentry *debugfs_create_dir(const char *name, struct dentry *parent);/* 删除debugfs 中的目录 */
void debugfs_remove_recursive(struct dentry *dentry);/* 在 debugfs 中建立文件, 还需要实现文件的操作方法 */
struct dentry *debugfs_create_file(const char *name, umode_t mode,struct dentry *parent, void *data,const struct file_operations *fops);/* 删除 debugfs 中的文件 */
void debugfs_remove(struct dentry *dentry);如果成功,此调用将在指定的父目录下创建一个名为name的目录。
如果parent参数为空NULL, 则会在debugfs根目录中创建。(/sys/kernel/debug)
创建目录成功时,返回值是一个指向dentry结构体的指针。
ERR_PTR (-ERROR)返回值表明出错。
ERR_PTR(-ENODEV),则表明内核是在没有 debugfs 支持的情况下构建的。
案例:

3.2、创建文件
要创建debugfs文件最常用的方法是调用这个函数:
struct dentry *debugfs_create_file(
    文件名, 权限, 父目录, 数据指针, 文件操作集合
);具体参数说明:
文件名:要创建的文件名称
权限:设置文件的读写权限(比如0644表示所有者可读写,其他可读)
父目录:指定文件保存的目录位置(可以留空使用默认目录)
数据指针:你的私有数据会被保存到文件内部(后续可通过这个访问)
文件操作集合:必须包含读/写操作函数,其他操作可选
函数返回值:
成功时返回文件的目录项指针
错误时返回错误代码包装指针(比如-ENODEV表示系统不支持debugfs)
如果需要创建指定初始大小的文件,可以改用:
struct dentry *debugfs_create_file_size(
    文件名, 权限, 父目录, 数据指针, 文件操作集合, 初始大小
);唯一的区别是新增了初始大小参数,用来设定文件的起始大小。其他参数和第一个函数完全相同。
关键要点:
必须实现
read()和/或write()函数其他操作(如open/close)可选实现
错误返回会用特殊指针包裹错误码,需要通过
IS_ERR()检查错误
3.3、其他函数
在调试时,如果你需要创建文件来显示或修改内核变量的值,debugfs提供了一些简单快捷的函数。这些函数能自动处理文件的读写操作,你只需要指定变量和路径即可。
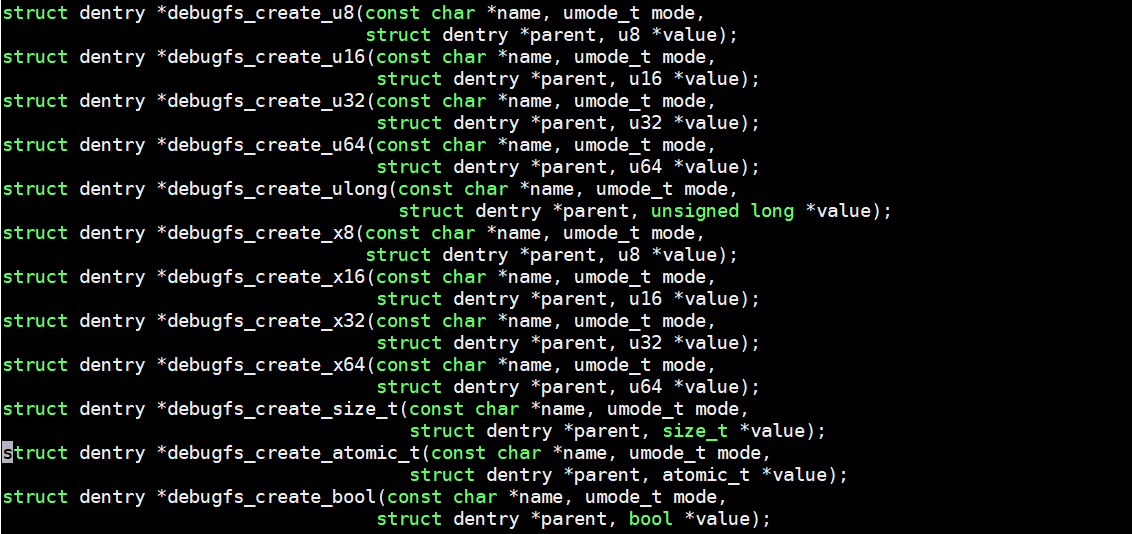
① 数值型文件(整数)
当你要创建显示单一整数值的文件时,可以直接使用以下函数:
// 十进制显示的数值文件
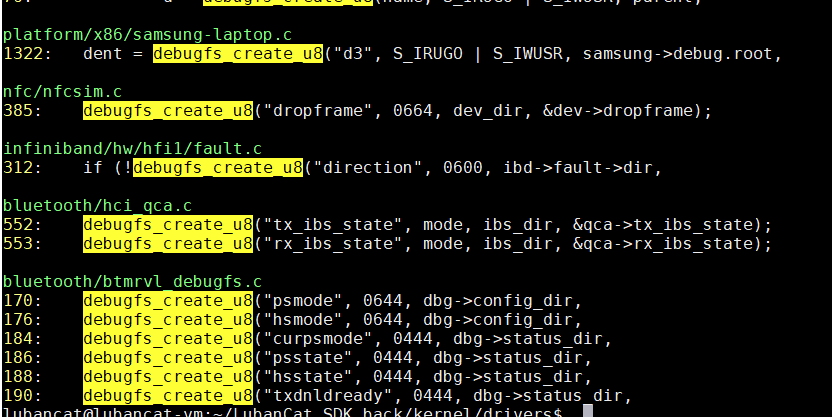
debugfs_create_u8("文件名", 权限, 父目录, &变量);
debugfs_create_u16("文件名", 权限, 父目录, &变量);
debugfs_create_u32("文件名", 权限, 父目录, &变量);
debugfs_create_u64("文件名", 权限, 父目录, &变量);
// 十六进制显示的数值文件(写入时自动转换)
debugfs_create_x8("文件名", 权限, 父目录, &变量);
debugfs_create_x16("文件名", 权限, 父目录, &变量);
debugfs_create_x32("文件名", 权限, 父目录, &变量);
debugfs_create_x64("文件名", 权限, 父目录, &变量);参数说明:
文件名:用户在debugfs中看到的文件名
权限:设置文件的读写权限(如0644表示只读,0666表示可读写)
父目录:文件存放的父目录路径(可以传入NULL使用默认目录)
变量地址:要绑定的内核变量地址(修改文件内容会直接改变该变量)
②特殊类型数值文件
1. size_t 类型
debugfs_create_size_t("文件名", 权限, 父目录, &size_t变量);- 用于显示
size_t类型变量(不同架构下可能占用不同字节)
2. 无符号长整型 (unsigned long)
// 十进制显示
debugfs_create_ulong("文件名", 权限, 父目录, &变量);
// 十六进制显示
debugfs_create_xul("文件名", 权限, 父目录, &变量);③ 布尔型文件
debugfs_create_bool("文件名", 权限, 父目录, &布尔变量);读取时:显示
Y(非零)或N(零)并换行写入时:接受
Y/N、y/n或1/0,其他输入会被忽略
④ 原子计数器 (**atomic_t**)
debugfs_create_atomic_t("文件名", 权限, 父目录, &原子变量);读取时显示原子变量的当前值
写入时会安全地更新原子变量的值(保证多线程安全)
⑤ 使用说明
自动处理:这些函数会自动生成对应的读写逻辑,无需手动编写文件操作函数
直接绑定:文件内容会直接映射到你提供的变量,修改文件即修改变量
路径管理:父目录参数可以帮你组织文件结构(如在特定子目录下创建)
权限控制:通过mode参数设置文件的读写权限(参考普通文件权限设置)
四、使用示例
#include <linux/init.h>
#include <linux/module.h>
#include <linux/debugfs.h> /* this is for DebugFS libraries */
#include <linux/fs.h>
#define len 200
u64 intvalue,hexvalue;
struct dentry *dirret,*fileret,*u64int,*u64hex;
char ker_buf[len];
int filevalue;

/* read file operation */
static ssize_t myreader(struct file *fp, char __user *user_buffer,
                                size_t count, loff_t *position)
{
     return simple_read_from_buffer(user_buffer, count, position, ker_buf, len);
}

/* write file operation */
static ssize_t mywriter(struct file *fp, const char __user *user_buffer,
                                size_t count, loff_t *position)
{
        if(count > len )
                return -EINVAL;

        return simple_write_to_buffer(ker_buf, len, position, user_buffer, count);
}

static const struct file_operations fops_debug = {
        .read = myreader,
        .write = mywriter,
};

static int __init init_debug(void)
{
    /* create a directory by the name dell in /sys/kernel/debugfs */
    dirret = debugfs_create_dir("dell", NULL);

    /* create a file in the above directory
    This requires read and write file operations */
    fileret = debugfs_create_file("text", 0644, dirret, &filevalue, &fops_debug);/* create a file which takes in a int(64) value */
    u64int = debugfs_create_u64("number", 0644, dirret, &intvalue);
    if (!u64int) {
        printk("error creating int file");
        return (-ENODEV);
    }
    /* takes a hex decimal value */
    u64hex = debugfs_create_x64("hexnum", 0644, dirret, &hexvalue );
    if (!u64hex) {
        printk("error creating hex file");
        return (-ENODEV);
    }

    return (0);
}
module_init(init_debug);

static void __exit exit_debug(void)
{
    /* removing the directory recursively which
    in turn cleans all the file */debugfs_remove_recursive(dirret);
}
module_exit(exit_debug);simple_read_from_buffer解释:
simple_read_from_buffer是Linux内核提供的一个函数,用于从缓冲区中读取数据。其定义如下:
ssize_t simple_read_from_buffer(void __user *to, size_t count,
                                loff_t *ppos, const void *from,
size_t available);该函数可以将指定长度(count)的数据从给定地址(from)的缓冲区中读取到用户空间(to)中,并更新文件偏移量(ppos),最后返回实际读取的字节数。
在使用该函数时,需要注意以下几点:
缓冲区必须是可访问的。
缓冲区大小必须大于等于要读取的数据长度。
文件偏移量(ppos)会被修改,因此需要在每次调用时更新它。
函数返回值为实际读取的字节数,可能小于请求的字节数。
simple_read_from_buffer通常被驱动程序或其他内核模块使用来处理字符设备、网络套接字等各种类型的I/O操作。