UI 与界面管理
本节介绍
📝本节您将熟悉了解本项目的UI绘制方法和思路,并且移植到自己的工程当中。
🏆本章⽬标
1️⃣明白项目UI组件的绘制方法;
2️⃣移植到自己工程中并验证;
UI组件介绍
项目中的UI组件都是手撸的。大家有能力的话也可以自行移植开源的轻量级UI库,例如LVGL、GuiLite、uGUI、GUISlice等等。
X轴居中的圆角矩形字符串
/*
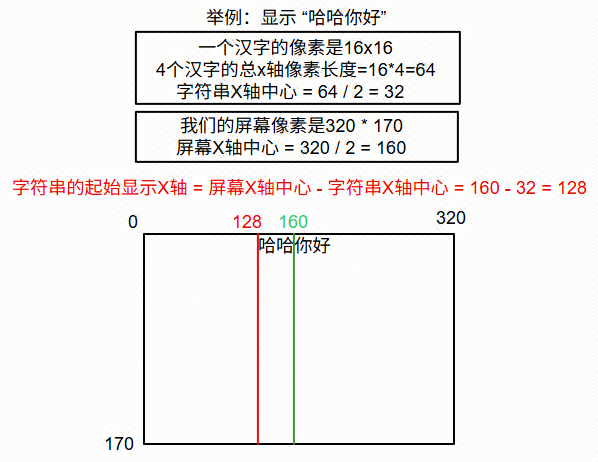
功能:基于屏幕X轴中心居中绘制彩色填充矩形,带居中的字符串
参数:
y=矩形起始Y轴
str_len=中文字符个数
bc=矩形背景色
sizey=字符像素大小
*str=要显示的字符串
*/
void disp_x_center(int y, int str_len, uint16_t bc, unsigned char sizey, unsigned char* str)
{
int str_center_x = (sizey * str_len) / 2;//字符中心x=字符串像素大小*字符串字符个数/2
int str_center_y = sizey / 2;//字符中心y=字符串像素大小/2
//绘制标题的圆角矩形
LCD_ArcRect(screen_center_x - str_center_x - 10, y, screen_center_x + str_center_x + 10, sizey+y, bc);
LCD_ShowChinese(screen_center_x - str_center_x,y,str,WHITE,bc,sizey,1);
}代码说明
screen_center_x: 屏幕X轴的中心点,我们的屏幕像素是 320 x 170,则X轴的中心点为screen_center_x = 320 / 2str_center_x: 字符串X轴的中心点,计算出来的是整个中文字符串起始显示X轴和字符串中间X轴之间的差值。- 两个英文字符算一个中文字符大小。
效果图:

任意位置的圆角矩形字符串
/*
功能:绘制彩色填充矩形,带居中的字符串
参数:  x=矩形起始X轴
        w=矩形宽度
        y=矩形起始Y轴
        h=矩形高度
        str_len=字符个数
        sizey=字符像素大小
        *str=要显示的字符串
        color矩形背景色
备注:GRAYBLUE 浅蓝
      DARKBLUE 深蓝
*/
void disp_string_rect(int x, int w, int y, int h, int str_len, int sizey, unsigned char* str, int color)
{
    int str_center_x = (sizey * str_len) / 2; //字符串中心x = 字符串像素大小*字符串字符个数/2
    int rect_center_x = x + (w / 2); //矩形中心x
    int str_center_y = sizey  / 2; //字符中心y=字符串像素大小/2
    int rect_center_y = y + (h / 2); //矩形中心y

    //绘制背景矩形
    LCD_ArcRect(x, y, x + w, y + h, color);
    //绘制字符串
    LCD_ShowChinese(rect_center_x - str_center_x, rect_center_y - str_center_y,str,WHITE,color,sizey,1);
}代码说明
原理同上一个函数说明,但是该函数支持自定义矩形的宽和高。
如果输入的不是中文字符串而是英文字符串,则在计算字符串中心x时需将 sizey / 2,即:
int str_center_x = ((sizey/2) * str_len) / 2; //字符串中心x = 字符串像素大小*字符串字符个数/2
效果图:
绘制选择框
/*
功能:绘制选择框
参数:  x=起始X轴地址
        w=绘制的选择框矩形宽度
        y=起始Y轴地址
        h=绘制的选择框矩形高度
        line_length=选择框的线长度
        interval=选择框 与 被选择矩形 之间的间隔像素
        color=选择框的颜色
*/
void disp_select_box(int x, int w, int y, int h, int line_length, int interval, int color)
{
    //计算 选择框 与 被选择矩形 的距离间隔
    x = x - interval;
    w = w + (interval + interval);
    y = y - interval;
    h = h + (interval + interval);
    //左上角
    LCD_DrawLine(x, y, x + line_length, y, color);
    LCD_DrawLine(x, y, x, y + line_length, color);
    //右上角
    LCD_DrawLine(x + w, y, x + w - line_length, y, color);
    LCD_DrawLine(x + w, y, x + w, y + line_length, color);
    //左下角
    LCD_DrawLine(x, y + h, x + line_length, y + h, color);
    LCD_DrawLine(x, y + h, x, y + h - line_length, color);
    //右下角
    LCD_DrawLine(x + w, y + h, x + w - line_length, y + h, color);
    LCD_DrawLine(x + w, y + h, x + w, y + h - line_length, color);
}代码说明

效果图:
绘制首页界面
//绘制首页界面
void ui_home_page(void)
{
    //关闭背光
    LCD_BLK_Clr();

    //绘制全局背景
    LCD_Fill(0,0,LCD_W,LCD_H,BLACK);
    //绘制来源
    disp_x_center(3,5,BLUE,16,(unsigned char *)"立创开发板");
    //绘制标题
    disp_x_center(3+16+3,8,BLUE,16,(unsigned char *)"简易PID入门套件");

    int x = 40;
    int x_offset = 80;
    int y = 65;
    int y_offset = 80;
    //绘制任务一:PID定速
    disp_string_rect(x, x_offset, y, y_offset, 2, 24, "定速", BLUE);
    int x2 = 200;
    int x2_offset = 80;
    int y2 = 65;
    int y2_offset = 80;
    //绘制任务二:PID定距
    disp_string_rect(x2, x2_offset, y2, y2_offset, 2, 24, "定距", BLUE);

    //根据首页当前选择内容 绘制选择框
    switch( get_default_page_flag() )
    {
        case 0:
        disp_select_box(40,80,65,80,10,5,WHITE);
        break;

        case 1:
        disp_select_box(200,80,65,80,10,5,WHITE);
        break;
    }

	LCD_BLK_Set();//打开背光
}代码说明
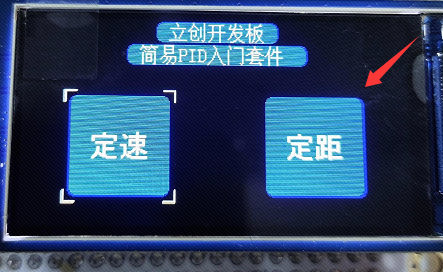
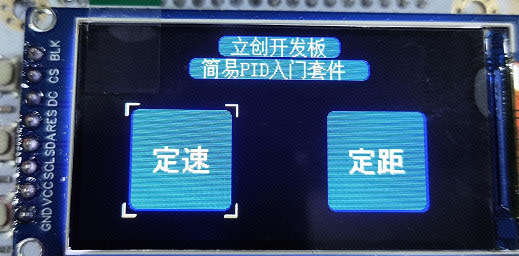
将 X轴居中的圆角矩形字符串、任意位置的圆角矩形字符串、选择框一起使用,绘制首页界面。
在显示完成之前是处于熄屏状态,当屏幕的内容刷新好后,再打开背光。这样在用户看来就是较为丝滑的界面切换。
效果图:
绘制定速页界面
typedef struct {
    unsigned int start_x;
    unsigned int start_y;
    unsigned int end_x;
    unsigned int end_y;
    unsigned int center;
} TXT_OBJECT;

void ui_speed_page(void)
{
    TXT_OBJECT p={0},i={0},d={0};

    //关闭背光
    LCD_BLK_Clr();

    //绘制全局背景
    LCD_Fill(0,0,LCD_W,LCD_H,BLACK);

    int str_center_x = (24 * 1) / 2;

    //显示静态的 P I D 标题
    LCD_ShowChar(screen_center_x - str_center_x - 84,87,'P',WHITE,BLUE,16,1);
    LCD_ShowChar(screen_center_x - str_center_x,     87,'I',WHITE,BLUE,16,1);
    LCD_ShowChar(screen_center_x - str_center_x + 84,87,'D',WHITE,BLUE,16,1);

    //显示 P 参数的圆角矩形背景
    p.start_x = screen_center_x - str_center_x - 84 - 30;
    p.start_y = 60+44;
    p.end_x = screen_center_x - str_center_x - 84 + 40;
    p.end_y = 60+44+24;
    LCD_ArcRect(p.start_x, p.start_y, p.end_x, p.end_y, BLUE);

    //显示 I 参数的圆角矩形背景
    i.start_x = screen_center_x - str_center_x  - 30;
    i.start_y = 60+44;
    i.end_x = screen_center_x - str_center_x  + 40;
    i.end_y = 60+44+24;
    LCD_ArcRect(i.start_x, i.start_y, i.end_x, i.end_y, BLUE);

    //显示 D 参数的圆角矩形背景
    d.start_x = screen_center_x - str_center_x + 84 - 30;
    d.start_y = 60+44;
    d.end_x = screen_center_x - str_center_x + 84 + 40;
    d.end_y = 60+44+24;
    LCD_ArcRect(d.start_x, d.start_y, d.end_x, d.end_y, BLUE);

    //显示静态的 Speed:  Target:  标题
    LCD_ShowString(20,170-34,"Speed: ",WHITE,BLUE,24,1);
    LCD_ShowString(320-150,170-34,"Target: ",WHITE,BLUE,24,1);

    LCD_BLK_Set();//打开背光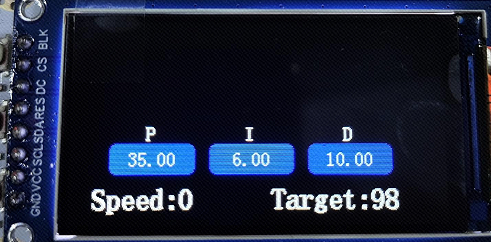
}代码说明
要显示的内容包括:P、I、D、Speed:、Target:等5个静态组件内容。还有这些组件对应的动态参数数据的显示。
这里为了方便后面的代码维护,将 P \ I \ D 三个动态内容的显示坐标定义为一个结构体对象,这样对各内容的坐标数字是什么意思就一目了然。
其实还可以优化,比如
84这个数字可以宏定义为 基于屏幕中心X轴坐标的固定偏移量。
比如
64+44这个参数可以宏定义为 基于静态显示内容P / I / D下一行的Y轴起始显示点。
效果图:
绘制定速页参数更新显示
void ui_speed_page_value_set(float p, float i, float d, int speed, int target,int quick_update)
{
    static float last_p,last_i,last_d;
    static int last_speed,last_target;

    unsigned char show_buff[50] = {0};
    TXT_OBJECT txt_p={0},txt_i={0},txt_d={0};
    int txt_size =0;        //一整个字符串的像素
    int char_width_pixel=8; //16x16大小的英文字符实际大小是8x16
    int rect_w = 70;        //矩形的宽度
    int rect_h = 24;        //矩形的高度
    int rect_start_x=34;    //第一个矩形的起始X轴位置
    int rect_apart_x=84;    //矩形与矩形间的间隔

    if( quick_update != 1 )//没有开启快速更新
    {
        last_p = 65535.0;//设置一个不可能的值
        last_i = 65535.0;//设置一个不可能的值
        last_d = 65535.0;//设置一个不可能的值
        last_speed = 65535;//设置一个不可能的值
        last_target = 65535;//设置一个不可能的值
    }

    if( last_p != p )
    {
       last_p = p;
        sprintf(show_buff, " %.2f ",p);
        txt_size = strlen(show_buff) * char_width_pixel;
        txt_p.start_x = rect_start_x + ((rect_w - txt_size) / 2);
        txt_p.start_y = 104 + ((rect_h - 16) / 2 );
        LCD_ShowString(txt_p.start_x,txt_p.start_y,show_buff,WHITE,BLUE,16,0);
    }
    if( last_i != i )
    {
       last_i = i;
        sprintf(show_buff, " %.2f ",i);
        txt_size = strlen(show_buff) * char_width_pixel;
        txt_i.start_x = (rect_start_x + rect_apart_x) + ((rect_w - txt_size) / 2);
        txt_i.start_y = 104 + ((rect_h - 16) / 2 );
        LCD_ShowString(txt_i.start_x,txt_i.start_y,show_buff,WHITE,BLUE,16,0);
    }
    if( last_d != d )
    {
       last_d = d;
        sprintf(show_buff, " %.2f ",d);
        txt_size = strlen(show_buff) * char_width_pixel;
        txt_d.start_x = (rect_start_x + rect_apart_x + rect_apart_x) + ((rect_w - txt_size) / 2);
        txt_d.start_y = 104 + ((rect_h - 16) / 2 );
        LCD_ShowString(txt_d.start_x,txt_d.start_y,show_buff,WHITE,BLUE,16,0);
    }
    if( last_speed != speed )
    {
       last_speed = speed;
        sprintf(show_buff, "%d ",speed);
        LCD_ShowString(12*6+20,170-34,show_buff,WHITE,BLACK,24,0);
    }
     if( last_target != target )
    {
       last_target = target;
        sprintf(show_buff, "%d ",target);
        LCD_ShowString(320-150 + 12*7,170-34,show_buff,WHITE,BLACK,24,0);
    }
}代码说明
为了优化性能,减少不必要的屏幕刷新,加快刷屏速度。该函数中通过旧数据和新数据的
if判断,实现只有在数据更新 或者说 发生变化时才刷新屏幕内容的目标,如果数据跟之前一样没有变化,则屏幕不刷新,直接跳过。具体实现思路:cstatic float last_p;//定义静态的旧数据 if( last_p != p ) //p为新数据,当旧数据和新数据不同时 { last_p = p;//更新旧数据为当前数据 ... //执行刷新任务 }第一次显示内容 或者 屏幕要重新显示出参数时,新数据和旧数据都是一样的没有变化,这样会导致不刷新内容。为了解决这个问题,新增了一个快速更新标志位
quick_update,当我们要让其不管怎么样都显示数据出来时,我们可以将旧数据设置为一个不会到达的值,这样新数据和旧数据不一样就可以刷新屏幕显示出来了。代码中使用
sprintf函数格式化浮点型和整型数据为字符串,再调用屏幕的字符串显示函数实现显示数字的功能。需要主要的是,在使用srpintf时,需要导入头文件include <stdio.h>,才能够使用。代码中还使用到了strlen函数获取字符串长度,该函数需要导入头文件include <string.h>,才能够使用。
效果图:
绘制参数选择框
//参数选择框
void ui_speed_page_select_box(int mode)
{
    char select_box_interval = 3;

    switch(mode)
    {
        case 0: //P
        disp_select_box(34,104-34,104,128-104,10,select_box_interval,WHITE);
        disp_select_box(118,188-118,104,128-104,10,select_box_interval,BLACK);
        disp_select_box(320-150,316-(320-150),170-34,166-(170-34),10,select_box_interval,BLACK);
        break;
        case 1: //I
        disp_select_box(118,188-118,104,128-104,10,select_box_interval,WHITE);
        disp_select_box(202,272-202,104,128-104,10,select_box_interval,BLACK);
        disp_select_box(34,104-34,104,128-104,10,select_box_interval,BLACK);
        break;
        case 2: //D
        disp_select_box(202,272-202,104,128-104,10,select_box_interval,WHITE);
        disp_select_box(320-150,316-(320-150),170-34,166-(170-34),10,select_box_interval,BLACK);
        disp_select_box(118,188-118,104,128-104,10,select_box_interval,BLACK);
        break;
        case 3: //target
        disp_select_box(320-150,316-(320-150),170-34,166-(170-34),10,select_box_interval,WHITE);
        disp_select_box(34,104-34,104,128-104,10,select_box_interval,BLACK);
        disp_select_box(202,272-202,104,128-104,10,select_box_interval,BLACK);
        break;
        case 4: //all clean
        disp_select_box(34,104-34,104,128-104,10,select_box_interval,BLACK);
        disp_select_box(118,188-118,104,128-104,10,select_box_interval,BLACK);
        disp_select_box(202,272-202,104,128-104,10,select_box_interval,BLACK);
        disp_select_box(320-150,316-(320-150),170-34,166-(170-34),10,select_box_interval,BLACK);
        break;
    }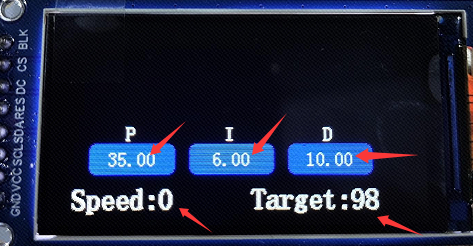
}代码说明
显示的顺序:
P -> I -> D -> target,target 的下一个又重新从 P 开始重复显示。函数传入的参数
mode,为选择的内容,比如我通过按键选择设置的参数时,选择到了P,那么就传入0;选择到了D,那么就传入2;选择到了target那么就传入3。显示对应的选择框时,要对其前后的位置都加上消除上一次的选择框。代码中就是当前的选择框是白色,其他的选择框都是背景色的黑色。其中
made = 4时,则全部不选择,相当于全部不显示选择框。
效果图:
绘制参数选中框
//参数选择框加粗
void ui_parameter_select_box_bold(int mode)
{
    char select_box_seze = 3;
    switch(mode)
    {
        case 0: //P
            LCD_DrawRectangle(34 - select_box_seze+1, 104 - select_box_seze+1, 104 + select_box_seze-1, 128 + select_box_seze-1, WHITE);
        break;
        case 1: //I
            LCD_DrawRectangle(118 - select_box_seze+1, 104 - select_box_seze+1, 188 + select_box_seze-1, 128 + select_box_seze-1, WHITE);
        break;
        case 2: //D
            LCD_DrawRectangle(202 - select_box_seze+1, 104 - select_box_seze+1, 272 + select_box_seze-1, 128 + select_box_seze-1, WHITE);
        break;
        case 3: //target
            LCD_DrawRectangle(320-150 - select_box_seze+1, 170-34 - select_box_seze+1, 316 + select_box_seze-1, 166 + select_box_seze-1, WHITE);
        break;
        case 4: //all clean
            LCD_DrawRectangle(34 - select_box_seze+1, 104 - select_box_seze+1, 104 + select_box_seze-1, 128 + select_box_seze-1, BLACK);
            LCD_DrawRectangle(118 - select_box_seze+1, 104 - select_box_seze+1, 188 + select_box_seze-1, 128 + select_box_seze-1, BLACK);
            LCD_DrawRectangle(202 - select_box_seze+1, 104 - select_box_seze+1, 272 + select_box_seze-1, 128 + select_box_seze-1, BLACK);
            LCD_DrawRectangle(320-150 - select_box_seze+1, 170-34 - select_box_seze+1, 316 + select_box_seze-1, 166 + select_box_seze-1, BLACK);
        break;
    }
}代码说明
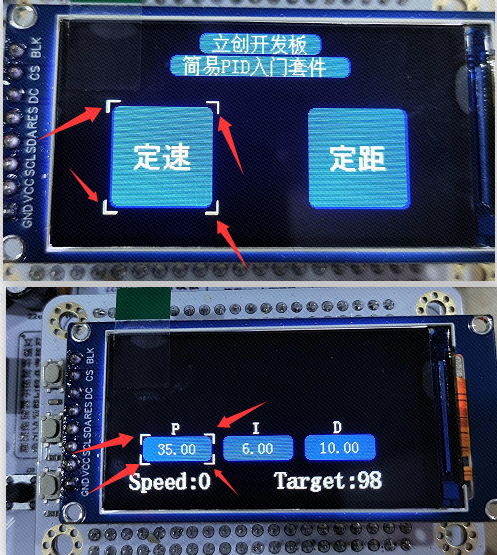
在选择的参数中表示这个参数被选中了。要怎么显示出效果?这里的解决办法是将之前的四角选择框再加一个矩形框,变化的动作就可以表现出这个参数被选中的效果。
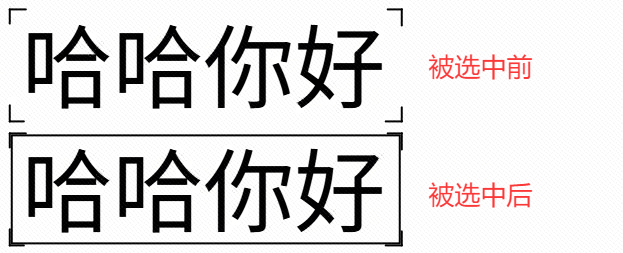
注意,这个矩形框的显示位置是要在四角选择框以内。如果矩形框覆盖四角选择框,在取消矩形框显示时,四角选择框就不见了;如果矩形框在四角选择框以外,那么对整个显示的组件位置就不确定了。
效果图:
绘制定距页内容
void ui_distance_page(void)
{
    TXT_OBJECT p={0},i={0},d={0};
    //关闭背光
    LCD_BLK_Clr();

    //绘制全局背景
    LCD_Fill(0,0,LCD_W,LCD_H,BLACK);

    int str_center_x = (24 * 1) / 2;

    LCD_ShowChar(screen_center_x - str_center_x - 84,87,'P',WHITE,BLUE,16,1);
    LCD_ShowChar(screen_center_x - str_center_x,     87,'I',WHITE,BLUE,16,1);
    LCD_ShowChar(screen_center_x - str_center_x + 84,87,'D',WHITE,BLUE,16,1);

    p.start_x = screen_center_x - str_center_x - 84 - 30;
    p.start_y = 60+44;
    p.end_x = screen_center_x - str_center_x - 84 + 40;
    p.end_y = 60+44+24;
    LCD_ArcRect(p.start_x, p.start_y, p.end_x, p.end_y, BLUE);

    i.start_x = screen_center_x - str_center_x  - 30;
    i.start_y = 60+44;
    i.end_x = screen_center_x - str_center_x  + 40;
    i.end_y = 60+44+24;
    LCD_ArcRect(i.start_x, i.start_y, i.end_x, i.end_y, BLUE);

    d.start_x = screen_center_x - str_center_x + 84 - 30;
    d.start_y = 60+44;
    d.end_x = screen_center_x - str_center_x + 84 + 40;
    d.end_y = 60+44+24;
    LCD_ArcRect(d.start_x, d.start_y, d.end_x, d.end_y, BLUE);

    LCD_ShowString(20,170-34,"Angle: ",WHITE,BLUE,24,1);
    LCD_ShowString(320-150,170-34,"Target: ",WHITE,BLUE,24,1);

    LCD_BLK_Set();//打开背光
}代码说明
具体思路同 绘制定速页界面 小节一致。
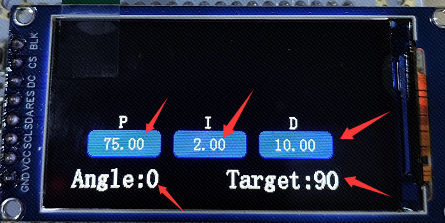
要显示的内容包括:P、I、D、Angle:、Target:等5个静态组件内容。还有这些组件对应的动态参数数据的显示。
这里为了方便后面的代码维护,将 P \ I \ D 三个动态内容的显示坐标定义为一个结构体对象,这样对各内容的坐标数字是什么意思就一目了然。
其实还可以优化,比如
84这个数字可以宏定义为 基于屏幕中心X轴坐标的固定偏移量。
比如
64+44这个参数可以宏定义为 基于静态显示内容P / I / D下一行的Y轴起始显示点。
效果图:

绘制定距页参数更新显示
void ui_distance_page_value_set(float p, float i, float d, int distance, int target,int quick_update)
{
    static float last_p,last_i,last_d;
    static int last_distance,last_target;

    unsigned char show_buff[50] = {0};
    TXT_OBJECT txt_p={0},txt_i={0},txt_d={0};
    int txt_size =0;        //一整个字符串的像素
    int char_width_pixel=8; //16x16大小的英文字符实际大小是8x16
    int rect_w = 70;        //矩形的宽度
    int rect_h = 24;        //矩形的高度
    int rect_start_x=34;    //第一个矩形的起始X轴位置
    int rect_apart_x=84;    //矩形与矩形间的间隔

    if( quick_update != 1 )//没有开启快速更新
    {
        last_p = 65535.0;//设置一个不可能的值
        last_i = 65535.0;//设置一个不可能的值
        last_d = 65535.0;//设置一个不可能的值
        last_distance = 65535;//设置一个不可能的值
        last_target = 65535;//设置一个不可能的值
    }

    if( last_p != p )
    {
       last_p = p;
        sprintf(show_buff, " %.2f ",p);
        txt_size = strlen(show_buff) * char_width_pixel;
        txt_p.start_x = rect_start_x + ((rect_w - txt_size) / 2);
        txt_p.start_y = 104 + ((rect_h - 16) / 2 );
        LCD_ShowString(txt_p.start_x,txt_p.start_y,show_buff,WHITE,BLUE,16,0);
    }
    if( last_i != i )
    {
       last_i = i;
        sprintf(show_buff, " %.2f ",i);
        txt_size = strlen(show_buff) * char_width_pixel;
        txt_i.start_x = (rect_start_x + rect_apart_x) + ((rect_w - txt_size) / 2);
        txt_i.start_y = 104 + ((rect_h - 16) / 2 );
        LCD_ShowString(txt_i.start_x,txt_i.start_y,show_buff,WHITE,BLUE,16,0);
    }
    if( last_d != d )
    {
       last_d = d;
        sprintf(show_buff, " %.2f ",d);
        txt_size = strlen(show_buff) * char_width_pixel;
        txt_d.start_x = (rect_start_x + rect_apart_x + rect_apart_x) + ((rect_w - txt_size) / 2);
        txt_d.start_y = 104 + ((rect_h - 16) / 2 );
        LCD_ShowString(txt_d.start_x,txt_d.start_y,show_buff,WHITE,BLUE,16,0);
    }
    if( last_distance != distance )
    {
        last_distance = distance;
        sprintf(show_buff, "%d ",distance);
        LCD_ShowString(12*6+20,170-34,show_buff,WHITE,BLACK,24,0);
    }
     if( last_target != target )
    {
       last_target = target;
        sprintf(show_buff, "%d ",target);
        LCD_ShowString(320-150 + 12*7,170-34,show_buff,WHITE,BLACK,24,0);
    }
}代码说明
具体思路同 绘制定速页参数更新显示 小节一致。
为了优化性能,减少不必要的屏幕刷新,加快刷屏速度。该函数中通过旧数据和新数据的
if判断,实现只有在数据更新 或者说 发生变化时才刷新屏幕内容的目标,如果数据跟之前一样没有变化,则屏幕不刷新,直接跳过。具体实现思路:cstatic float last_p;//定义静态的旧数据 if( last_p != p ) //p为新数据,当旧数据和新数据不同时 { last_p = p;//更新旧数据为当前数据 ... //执行刷新任务 }第一次显示内容 或者 屏幕要重新显示出参数时,新数据和旧数据都是一样的没有变化,这样会导致不刷新内容。为了解决这个问题,新增了一个快速更新标志位
quick_update,当我们要让其不管怎么样都显示数据出来时,我们可以将旧数据设置为一个不会到达的值,这样新数据和旧数据不一样就可以刷新屏幕显示出来了。代码中使用
sprintf函数格式化浮点型和整型数据为字符串,再调用屏幕的字符串显示函数实现显示数字的功能。需要主要的是,在使用srpintf时,需要导入头文件include <stdio.h>,才能够使用。代码中还使用到了strlen函数获取字符串长度,该函数需要导入头文件include <string.h>,才能够使用。
效果图:
绘制波形
/*
*   函数内容:画波形
*   函数参数:window_start_x 波形的起始X轴坐标
              window_start_y 波形的起始Y轴坐标
              window_w 波形组件的整体宽度
              window_w 波形组件的整体高度
              curve_color 波形线的颜色
              background_color 波形组件背景色
              rawValue 波形Y轴数据
*   返回值:  当前波形的X轴坐标点
*/
uint16_t draw_speed_curve(int window_start_x,int window_start_y,int window_w,int window_h,int curve_color,int background_color,short int rawValue)
{
	uint16_t x=0,y=0,i=0;
    static char firstPoint=1;   //是否是刚刚开始画,第一次进入
    static uint16_t lastX=0,lastY=0;

    //限幅最大和最小输入值
	if( rawValue >= window_h )
    {
        rawValue = window_h;
	}
    if( rawValue <= 0 )
    {
        rawValue = 0;
    }

    //基于波形框 底部Y轴点 计算显示数据的偏移量
	y = ( window_start_y + window_h ) - rawValue;

	if(firstPoint)//如果是第一次画点,则无需连线,直接描点即可
	{
		LCD_DrawPoint(window_start_x,y,curve_color);
		lastX=window_start_x;
		lastY=y;
		firstPoint=0;
        return 0;
	}

    //更新X轴时间线
    x=lastX + 1;

    if( x < window_w )  //不超过屏幕宽度
    {
        //清除当前位置的内容
        LCD_DrawVerrticalLine(x, window_start_y, window_start_y + window_h, background_color);
        //在当前位置跟之前位置之间连线
        LCD_DrawLine(lastX,lastY,x,y,curve_color);
        //下一列绘制白竖线表示X轴刷新点
        LCD_DrawVerrticalLine(x+1, window_start_y, window_start_y + window_h, WHITE);
        //更新之前的坐标为当前坐标
        lastX = x;
        lastY = y;
    }
    else  //超出屏幕宽度,清屏,从第一个点开始绘制,实现动态更新效果
    {
        //清除第一列中之前的点
        LCD_DrawVerrticalLine(window_start_x , window_start_y, window_start_y + window_h, background_color);
        //显示当前的点
        LCD_DrawPoint(window_start_x, y, curve_color);
        //更新之前的坐标为当前坐标
        lastX = window_start_x;
        lastY = y;
    }
    return x;
}代码说明
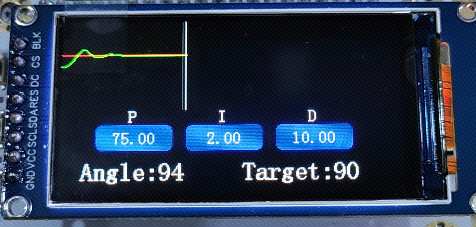
以时间为X轴,目标值为Y轴建立平面直角坐标系,将编码器数值按照指定衰减系数衰减到Y轴最大范围,然后转换为平面直角坐标系上的点,画一个点,使其与前面的点连接成线,然后将时间轴往前推一格,再基于当前X轴+1的位置绘制白竖线表示当前波形进度。如此循环往复。
将编码器数值按照指定衰减系数衰减到Y轴最大范围:比如,我现在的编码器数值最大是100,但是我波形组件最大的显示范围是88,我可以通过将 编码器数值衰减2倍,100 / 2 = 50,这样就没有超过波形的显示范围。为了衰减的更加接近波形最大范围,你的衰减系数可以是小数点,比如 100 / 1.137 = 87.95,在C语言的int型自动进位下,变成最大88。
效果图:
移植到自己的工程
工程创建
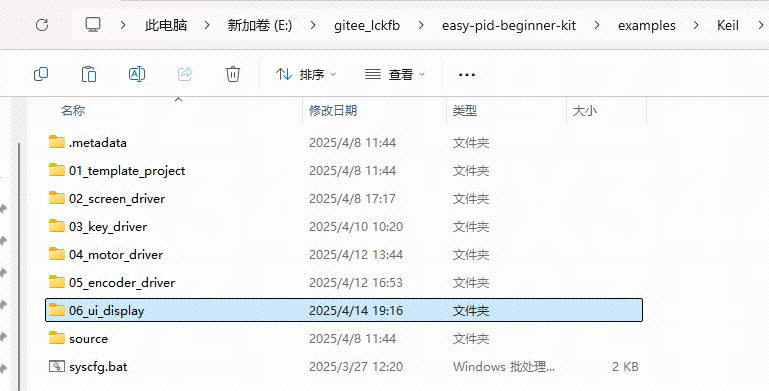
复制粘贴上一个章节的工程,并重新命名为 06_ui_display 。
 |
|---|
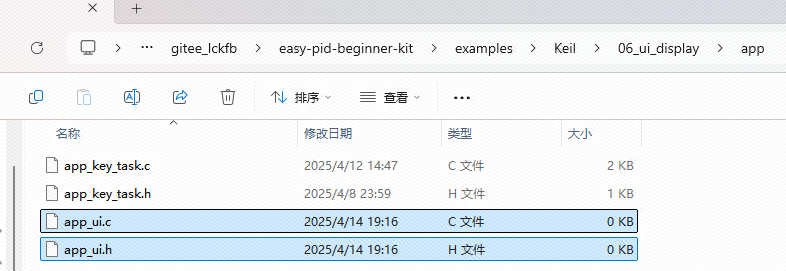
在新工程下的 app 文件夹中,新建两个文件 app_ui.c 和 app_ui.h 。然后打开该工程,往工程下的 app 虚拟文件夹添加新建的 .c 文件。
 | 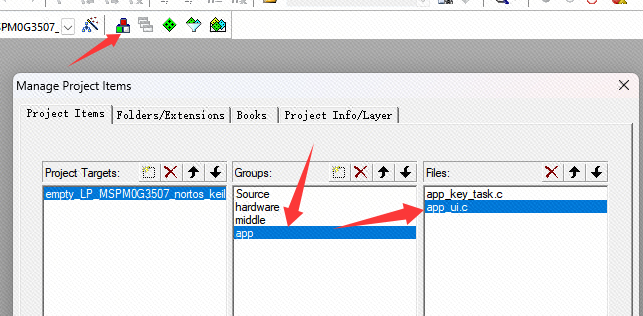 |
|---|---|
更新工程的头文件路径为该工程的路径。
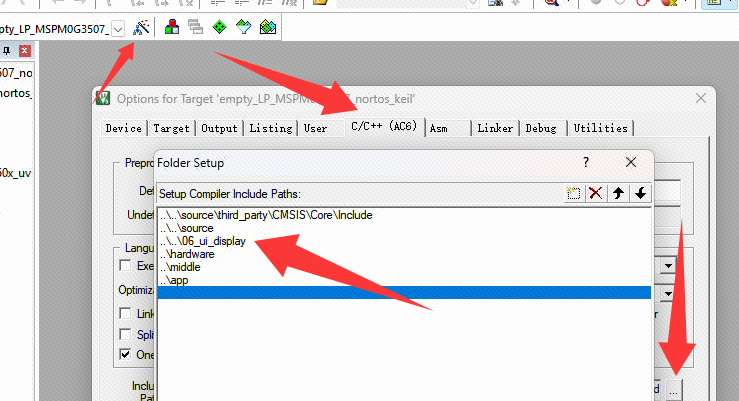 |
|---|
代码移植
往 app_ui.c 文件中加入以下app_ui.c选项页的代码,往 app_ui.h 文件中加入以下app_ui.h选项页的代码:
#ifndef _APP_UI_H_
#define _APP_UI_H_

#include "ti_msp_dl_config.h"

#define screen_center_x (LCD_W/2)//屏幕中心X = 屏幕x/2
#define screen_center_y (LCD_H/2)//屏幕中心Y = 屏幕y/2

void ui_home_page(void);                //绘制首页静态UI
void ui_home_page_select(int mode);     //绘制首页选择框

void ui_speed_page(void);//绘制定速页静态UI
void ui_speed_page_value_set(float p, float i, float d, int speed, int target,int quick_update);    //绘制定速页参数值的变化
void ui_speed_page_select_box(int mode);//绘制定速页选择框

void ui_distance_page(void);//绘制定距页静态UI
void ui_distance_page_value_set(float p, float i, float d, int distance, int target,int quick_update);//绘制定距页参数值的变化

void ui_select_page_show(unsigned char page);//根据选择确定显示哪一个页面
void ui_parameter_select_box_bold(int mode); //参数选择框加粗,即选中框

uint16_t draw_speed_curve(int window_start_x,int window_start_y,int window_w,int window_h,int curve_color,int background_color,short int rawValue);

#endif#include "app_ui.h"
#include "string.h"
#include "stdio.h"
#include "hw_lcd.h"
/*
功能:基于屏幕X轴中心居中绘制彩色填充矩形,带居中的字符串
参数:
y=矩形起始Y轴
str_len=中文字符个数
bc=矩形背景色
sizey=字符像素大小
*str=要显示的字符串
*/
void disp_x_center(int y, int str_len, uint16_t bc, unsigned char sizey, unsigned char* str)
{
int str_center_x = (sizey * str_len) / 2;//字符中心x=字符串像素大小*字符串字符个数/2
int str_center_y = sizey / 2;//字符中心y=字符串像素大小/2
//绘制标题的圆角矩形
LCD_ArcRect(screen_center_x - str_center_x - 10, y, screen_center_x + str_center_x + 10, sizey+y, bc);
LCD_ShowChinese(screen_center_x - str_center_x,y,str,WHITE,bc,sizey,1);
}
/*
功能:绘制彩色填充矩形,带居中的字符串
参数: x=矩形起始X轴
w=矩形宽度
y=矩形起始Y轴
h=矩形高度
str_len=字符个数
sizey=字符像素大小
*str=要显示的字符串
color矩形背景色
备注:GRAYBLUE 浅蓝
DARKBLUE 深蓝
*/
void disp_string_rect(int x, int w, int y, int h, int str_len, int sizey, unsigned char* str, int color)
{
int str_center_x = (sizey * str_len) / 2; //字符串中心x = 字符串像素大小*字符串字符个数/2
int rect_center_x = x + (w / 2); //矩形中心x
int str_center_y = sizey / 2; //字符中心y=字符串像素大小/2
int rect_center_y = y + (h / 2); //矩形中心y
//绘制背景矩形
LCD_ArcRect(x, y, x + w, y + h, color);
//绘制字符串
LCD_ShowChinese(rect_center_x - str_center_x, rect_center_y - str_center_y,str,WHITE,color,sizey,1);
}
/*
功能:绘制选择框
参数: x=起始X轴地址
w=绘制的选择框矩形宽度
y=起始Y轴地址
h=绘制的选择框矩形高度
line_length=选择框的线长度
interval=选择框 与 被选择矩形 之间的间隔像素
color=选择框的颜色
*/
void disp_select_box(int x, int w, int y, int h, int line_length, int interval, int color)
{
//计算 选择框 与 被选择矩形 的距离间隔
x = x - interval;
w = w + (interval + interval);
y = y - interval;
h = h + (interval + interval);
//左上角
LCD_DrawLine(x, y, x + line_length, y, color);
LCD_DrawLine(x, y, x, y + line_length, color);
//右上角
LCD_DrawLine(x + w, y, x + w - line_length, y, color);
LCD_DrawLine(x + w, y, x + w, y + line_length, color);
//左下角
LCD_DrawLine(x, y + h, x + line_length, y + h, color);
LCD_DrawLine(x, y + h, x, y + h - line_length, color);
//右下角
LCD_DrawLine(x + w, y + h, x + w - line_length, y + h, color);
LCD_DrawLine(x + w, y + h, x + w, y + h - line_length, color);
}
//绘制首页界面
void ui_home_page(void)
{
//关闭背光
LCD_BLK_Clr();
//绘制全局背景
LCD_Fill(0,0,LCD_W,LCD_H,BLACK);
//绘制来源
disp_x_center(3,5,BLUE,16,(unsigned char *)"立创开发板");
//绘制标题
disp_x_center(3+16+3,8,BLUE,16,(unsigned char *)"简易PID入门套件");
int x = 40;
int x_offset = 80;
int y = 65;
int y_offset = 80;
//绘制任务一:PID定速
disp_string_rect(x, x_offset, y, y_offset, 2, 24, "定速", BLUE);
int x2 = 200;
int x2_offset = 80;
int y2 = 65;
int y2_offset = 80;
//绘制任务二:PID定距
disp_string_rect(x2, x2_offset, y2, y2_offset, 2, 24, "定距", BLUE);
//根据首页当前选择内容 绘制选择框
switch( 0 )
{
case 0:
disp_select_box(40,80,65,80,10,5,WHITE);
break;
case 1:
disp_select_box(200,80,65,80,10,5,WHITE);
break;
}
LCD_BLK_Set();//打开背光
}
//根据按键选择绘制首页两个选项的选择框
void ui_home_page_select(int mode)
{
char select_box_seze = 5;
switch(mode)
{
case 0: //选择PID定速模式
disp_select_box(40,80,65,80,10,select_box_seze,WHITE);
disp_select_box(200,80,65,80,10,select_box_seze,BLACK);
break;
case 1: //选择PID定距模式
disp_select_box(40,80,65,80,10,select_box_seze,BLACK);
disp_select_box(200,80,65,80,10,select_box_seze,WHITE);
break;
}
}
typedef struct {
unsigned int start_x;
unsigned int start_y;
unsigned int end_x;
unsigned int end_y;
unsigned int center;
} TXT_OBJECT;
//绘制定速页界面
void ui_speed_page(void)
{
TXT_OBJECT p={0},i={0},d={0};
//关闭背光
LCD_BLK_Clr();
//绘制全局背景
LCD_Fill(0,0,LCD_W,LCD_H,BLACK);
int str_center_x = (24 * 1) / 2;
//显示静态的 P I D 标题
LCD_ShowChar(screen_center_x - str_center_x - 84,87,'P',WHITE,BLUE,16,1);
LCD_ShowChar(screen_center_x - str_center_x, 87,'I',WHITE,BLUE,16,1);
LCD_ShowChar(screen_center_x - str_center_x + 84,87,'D',WHITE,BLUE,16,1);
//显示 P 参数的圆角矩形背景
p.start_x = screen_center_x - str_center_x - 84 - 30;
p.start_y = 60+44;
p.end_x = screen_center_x - str_center_x - 84 + 40;
p.end_y = 60+44+24;
LCD_ArcRect(p.start_x, p.start_y, p.end_x, p.end_y, BLUE);
//显示 I 参数的圆角矩形背景
i.start_x = screen_center_x - str_center_x - 30;
i.start_y = 60+44;
i.end_x = screen_center_x - str_center_x + 40;
i.end_y = 60+44+24;
LCD_ArcRect(i.start_x, i.start_y, i.end_x, i.end_y, BLUE);
//显示 D 参数的圆角矩形背景
d.start_x = screen_center_x - str_center_x + 84 - 30;
d.start_y = 60+44;
d.end_x = screen_center_x - str_center_x + 84 + 40;
d.end_y = 60+44+24;
LCD_ArcRect(d.start_x, d.start_y, d.end_x, d.end_y, BLUE);
//显示静态的 Speed: Target: 标题
LCD_ShowString(20,170-34,"Speed: ",WHITE,BLUE,24,1);
LCD_ShowString(320-150,170-34,"Target: ",WHITE,BLUE,24,1);
LCD_BLK_Set();//打开背光
}
/*
功能:绘制定速页参数更新显示
参数: p=当前P值
i=当前I值
d=当前D值
speed=当前速度值
target=当前目前值
quick_update=1开启快速刷新 =0关闭快速刷新
*/
void ui_speed_page_value_set(float p, float i, float d, int speed, int target,int quick_update)
{
static float last_p,last_i,last_d;
static int last_speed,last_target;
unsigned char show_buff[50] = {0};
TXT_OBJECT txt_p={0},txt_i={0},txt_d={0};
int txt_size =0; //一整个字符串的像素
int char_width_pixel=8; //16x16大小的英文字符实际大小是8x16
int rect_w = 70; //矩形的宽度
int rect_h = 24; //矩形的高度
int rect_start_x=34; //第一个矩形的起始X轴位置
int rect_apart_x=84; //矩形与矩形间的间隔
if( quick_update != 1 )//没有开启快速更新
{
last_p = 65535.0;//设置一个不可能的值
last_i = 65535.0;//设置一个不可能的值
last_d = 65535.0;//设置一个不可能的值
last_speed = 65535;//设置一个不可能的值
last_target = 65535;//设置一个不可能的值
}
if( last_p != p )
{
last_p = p;
sprintf(show_buff, " %.2f ",p);
txt_size = strlen(show_buff) * char_width_pixel;
txt_p.start_x = rect_start_x + ((rect_w - txt_size) / 2);
txt_p.start_y = 104 + ((rect_h - 16) / 2 );
LCD_ShowString(txt_p.start_x,txt_p.start_y,show_buff,WHITE,BLUE,16,0);
}
if( last_i != i )
{
last_i = i;
sprintf(show_buff, " %.2f ",i);
txt_size = strlen(show_buff) * char_width_pixel;
txt_i.start_x = (rect_start_x + rect_apart_x) + ((rect_w - txt_size) / 2);
txt_i.start_y = 104 + ((rect_h - 16) / 2 );
LCD_ShowString(txt_i.start_x,txt_i.start_y,show_buff,WHITE,BLUE,16,0);
}
if( last_d != d )
{
last_d = d;
sprintf(show_buff, " %.2f ",d);
txt_size = strlen(show_buff) * char_width_pixel;
txt_d.start_x = (rect_start_x + rect_apart_x + rect_apart_x) + ((rect_w - txt_size) / 2);
txt_d.start_y = 104 + ((rect_h - 16) / 2 );
LCD_ShowString(txt_d.start_x,txt_d.start_y,show_buff,WHITE,BLUE,16,0);
}
if( last_speed != speed )
{
last_speed = speed;
sprintf(show_buff, "%d ",speed);
LCD_ShowString(12*6+20,170-34,show_buff,WHITE,BLACK,24,0);
}
if( last_target != target )
{
last_target = target;
sprintf(show_buff, "%d ",target);
LCD_ShowString(320-150 + 12*7,170-34,show_buff,WHITE,BLACK,24,0);
}
}
//绘制参数选择框
// mode = 0 选择P值显示选择框
// mode = 1 选择I值显示选择框
// mode = 2 选择D值显示选择框
// mode = 3 选择target值显示选择框
// mode = 4 全部不显示选择框
void ui_speed_page_select_box(int mode)
{
char select_box_interval = 3;
switch(mode)
{
case 0: //P
disp_select_box(34,104-34,104,128-104,10,select_box_interval,WHITE);
disp_select_box(118,188-118,104,128-104,10,select_box_interval,BLACK);
disp_select_box(320-150,316-(320-150),170-34,166-(170-34),10,select_box_interval,BLACK);
break;
case 1: //I
disp_select_box(118,188-118,104,128-104,10,select_box_interval,WHITE);
disp_select_box(202,272-202,104,128-104,10,select_box_interval,BLACK);
disp_select_box(34,104-34,104,128-104,10,select_box_interval,BLACK);
break;
case 2: //D
disp_select_box(202,272-202,104,128-104,10,select_box_interval,WHITE);
disp_select_box(320-150,316-(320-150),170-34,166-(170-34),10,select_box_interval,BLACK);
disp_select_box(118,188-118,104,128-104,10,select_box_interval,BLACK);
break;
case 3: //target
disp_select_box(320-150,316-(320-150),170-34,166-(170-34),10,select_box_interval,WHITE);
disp_select_box(34,104-34,104,128-104,10,select_box_interval,BLACK);
disp_select_box(202,272-202,104,128-104,10,select_box_interval,BLACK);
break;
case 4: //all clean
disp_select_box(34,104-34,104,128-104,10,select_box_interval,BLACK);
disp_select_box(118,188-118,104,128-104,10,select_box_interval,BLACK);
disp_select_box(202,272-202,104,128-104,10,select_box_interval,BLACK);
disp_select_box(320-150,316-(320-150),170-34,166-(170-34),10,select_box_interval,BLACK);
break;
}
}
//绘制参数选中框
// mode = 0 选择P值显示选中框
// mode = 1 选择I值显示选中框
// mode = 2 选择D值显示选中框
// mode = 3 选择target值显示选中框
// mode = 4 全部不显示选中框
void ui_parameter_select_box_bold(int mode)
{
char select_box_seze = 3;
switch(mode)
{
case 0: //P
LCD_DrawRectangle(34 - select_box_seze+1, 104 - select_box_seze+1, 104 + select_box_seze-1, 128 + select_box_seze-1, WHITE);
break;
case 1: //I
LCD_DrawRectangle(118 - select_box_seze+1, 104 - select_box_seze+1, 188 + select_box_seze-1, 128 + select_box_seze-1, WHITE);
break;
case 2: //D
LCD_DrawRectangle(202 - select_box_seze+1, 104 - select_box_seze+1, 272 + select_box_seze-1, 128 + select_box_seze-1, WHITE);
break;
case 3: //target
LCD_DrawRectangle(320-150 - select_box_seze+1, 170-34 - select_box_seze+1, 316 + select_box_seze-1, 166 + select_box_seze-1, WHITE);
break;
case 4: //all clean
LCD_DrawRectangle(34 - select_box_seze+1, 104 - select_box_seze+1, 104 + select_box_seze-1, 128 + select_box_seze-1, BLACK);
LCD_DrawRectangle(118 - select_box_seze+1, 104 - select_box_seze+1, 188 + select_box_seze-1, 128 + select_box_seze-1, BLACK);
LCD_DrawRectangle(202 - select_box_seze+1, 104 - select_box_seze+1, 272 + select_box_seze-1, 128 + select_box_seze-1, BLACK);
LCD_DrawRectangle(320-150 - select_box_seze+1, 170-34 - select_box_seze+1, 316 + select_box_seze-1, 166 + select_box_seze-1, BLACK);
break;
}
}
//绘制定距页内容
void ui_distance_page(void)
{
TXT_OBJECT p={0},i={0},d={0};
//关闭背光
LCD_BLK_Clr();
//绘制全局背景
LCD_Fill(0,0,LCD_W,LCD_H,BLACK);
int str_center_x = (24 * 1) / 2;
LCD_ShowChar(screen_center_x - str_center_x - 84,87,'P',WHITE,BLUE,16,1);
LCD_ShowChar(screen_center_x - str_center_x, 87,'I',WHITE,BLUE,16,1);
LCD_ShowChar(screen_center_x - str_center_x + 84,87,'D',WHITE,BLUE,16,1);
p.start_x = screen_center_x - str_center_x - 84 - 30;
p.start_y = 60+44;
p.end_x = screen_center_x - str_center_x - 84 + 40;
p.end_y = 60+44+24;
LCD_ArcRect(p.start_x, p.start_y, p.end_x, p.end_y, BLUE);
i.start_x = screen_center_x - str_center_x - 30;
i.start_y = 60+44;
i.end_x = screen_center_x - str_center_x + 40;
i.end_y = 60+44+24;
LCD_ArcRect(i.start_x, i.start_y, i.end_x, i.end_y, BLUE);
d.start_x = screen_center_x - str_center_x + 84 - 30;
d.start_y = 60+44;
d.end_x = screen_center_x - str_center_x + 84 + 40;
d.end_y = 60+44+24;
LCD_ArcRect(d.start_x, d.start_y, d.end_x, d.end_y, BLUE);
LCD_ShowString(20,170-34,"Angle: ",WHITE,BLUE,24,1);
LCD_ShowString(320-150,170-34,"Target: ",WHITE,BLUE,24,1);
LCD_BLK_Set();//打开背光
}
/*
功能:绘制定距页参数更新显示
参数: p=当前P值
i=当前I值
d=当前D值
distance=当前角度值
target=当前目前值
quick_update=1开启快速刷新 =0关闭快速刷新
*/
void ui_distance_page_value_set(float p, float i, float d, int distance, int target,int quick_update)
{
static float last_p,last_i,last_d;
static int last_distance,last_target;
unsigned char show_buff[50] = {0};
TXT_OBJECT txt_p={0},txt_i={0},txt_d={0};
int txt_size =0; //一整个字符串的像素
int char_width_pixel=8; //16x16大小的英文字符实际大小是8x16
int rect_w = 70; //矩形的宽度
int rect_h = 24; //矩形的高度
int rect_start_x=34; //第一个矩形的起始X轴位置
int rect_apart_x=84; //矩形与矩形间的间隔
if( quick_update != 1 )//没有开启快速更新
{
last_p = 65535.0;//设置一个不可能的值
last_i = 65535.0;//设置一个不可能的值
last_d = 65535.0;//设置一个不可能的值
last_distance = 65535;//设置一个不可能的值
last_target = 65535;//设置一个不可能的值
}
if( last_p != p )
{
last_p = p;
sprintf(show_buff, " %.2f ",p);
txt_size = strlen(show_buff) * char_width_pixel;
txt_p.start_x = rect_start_x + ((rect_w - txt_size) / 2);
txt_p.start_y = 104 + ((rect_h - 16) / 2 );
LCD_ShowString(txt_p.start_x,txt_p.start_y,show_buff,WHITE,BLUE,16,0);
}
if( last_i != i )
{
last_i = i;
sprintf(show_buff, " %.2f ",i);
txt_size = strlen(show_buff) * char_width_pixel;
txt_i.start_x = (rect_start_x + rect_apart_x) + ((rect_w - txt_size) / 2);
txt_i.start_y = 104 + ((rect_h - 16) / 2 );
LCD_ShowString(txt_i.start_x,txt_i.start_y,show_buff,WHITE,BLUE,16,0);
}
if( last_d != d )
{
last_d = d;
sprintf(show_buff, " %.2f ",d);
txt_size = strlen(show_buff) * char_width_pixel;
txt_d.start_x = (rect_start_x + rect_apart_x + rect_apart_x) + ((rect_w - txt_size) / 2);
txt_d.start_y = 104 + ((rect_h - 16) / 2 );
LCD_ShowString(txt_d.start_x,txt_d.start_y,show_buff,WHITE,BLUE,16,0);
}
if( last_distance != distance )
{
last_distance = distance;
sprintf(show_buff, "%d ",distance);
LCD_ShowString(12*6+20,170-34,show_buff,WHITE,BLACK,24,0);
}
if( last_target != target )
{
last_target = target;
sprintf(show_buff, "%d ",target);
LCD_ShowString(320-150 + 12*7,170-34,show_buff,WHITE,BLACK,24,0);
}
}
//选择要显示哪一个页面
// select_flag = 0 显示定速页
// select_flag = 1 显示定距页
// select_flag = 2 显示首页
void ui_select_page_show(unsigned char select_flag)
{
if( select_flag == 2 )
{
ui_home_page();
}
if( select_flag == 0 )
{
ui_speed_page();
}
if( select_flag == 1 )
{
ui_distance_page();
}
}
/*
* 函数内容:画定速的PID波形
* 函数参数:window_start_x 波形的起始X轴坐标
window_start_y 波形的起始Y轴坐标
window_w 波形组件的整体宽度
window_w 波形组件的整体高度
curve_color 波形线的颜色
background_color 波形组件背景色
rawValue 波形Y轴数据
* 返回值: 当前波形的X轴坐标点
*/
uint16_t draw_speed_curve(int window_start_x,int window_start_y,int window_w,int window_h,int curve_color,int background_color,short int rawValue)
{
uint16_t x=0,y=0,i=0;
static char firstPoint=1; //是否是刚刚开始画,第一次进入
static uint16_t lastX=0,lastY=0;
//限幅最大和最小输入值
if( rawValue >= window_h )
{
rawValue = window_h;
}
if( rawValue <= 0 )
{
rawValue = 0;
}
//基于波形框 底部Y轴点 计算显示数据的偏移量
y = ( window_start_y + window_h ) - rawValue;
if(firstPoint)//如果是第一次画点,则无需连线,直接描点即可
{
LCD_DrawPoint(window_start_x,y,curve_color);
lastX=window_start_x;
lastY=y;
firstPoint=0;
return 0;
}
//更新X轴时间线
x=lastX + 1;
if( x < window_w ) //不超过屏幕宽度
{
//清除当前位置的内容
LCD_DrawVerrticalLine(x, window_start_y, window_start_y + window_h, background_color);
//在当前位置跟之前位置之间连线
LCD_DrawLine(lastX,lastY,x,y,curve_color);
//下一列绘制白竖线表示X轴刷新点
LCD_DrawVerrticalLine(x+1, window_start_y, window_start_y + window_h, WHITE);
//更新之前的坐标为当前坐标
lastX = x;
lastY = y;
}
else //超出屏幕宽度,清屏,从第一个点开始绘制,实现动态更新效果
{
//清除第一列中之前的点
LCD_DrawVerrticalLine(window_start_x , window_start_y, window_start_y + window_h, background_color);
//显示当前的点
LCD_DrawPoint(window_start_x, y, curve_color);
//更新之前的坐标为当前坐标
lastX = window_start_x;
lastY = y;
}
return x;
}
/*
* 函数内容:画定距的PID波形
* 函数参数:window_start_x 波形的起始X轴坐标
window_start_y 波形的起始Y轴坐标
window_w 波形组件的整体宽度
window_w 波形组件的整体高度
curve_color 波形线的颜色
background_color 波形组件背景色
rawValue 波形Y轴数据
* 返回值: 当前波形的X轴坐标点
*/
uint16_t draw_distance_curve(int window_start_x,int window_start_y,int window_w,int window_h,int curve_color,int background_color,short int rawValue)
{
uint16_t x=0,y=0,i=0;
static char firstPoint=1; //是否是刚刚开始画,第一次进入
static uint16_t lastX=0,lastY=0;
//限幅最大和最小输入值
if( rawValue >= window_h )
{
rawValue = window_h;
}
if( rawValue <= 0 )
{
rawValue = 0;
}
//基于波形框 底部Y轴点 计算显示数据的偏移量
y = ( window_start_y + window_h ) - rawValue;
if(firstPoint)//如果是第一次画点,则无需连线,直接描点即可
{
LCD_DrawPoint(window_start_x,y,curve_color);
lastX=window_start_x;
lastY=y;
firstPoint=0;
return 0;
}
x=lastX+1;
if( x < window_w ) //不超过屏幕宽度
{
LCD_DrawVerrticalLine(x, window_start_y, window_start_y + window_h, background_color);
LCD_DrawLine(lastX,lastY,x,y,curve_color);
//清除下一个地方的显示内容
LCD_DrawVerrticalLine(x+1, window_start_y, window_start_y + window_h, WHITE);
lastX = x;
lastY = y;
}
else //超出屏幕宽度,清屏,从第一个点开始绘制,实现动态更新效果
{
LCD_DrawVerrticalLine(window_start_x , window_start_y, window_start_y + window_h, background_color);
LCD_DrawPoint(window_start_x, y, curve_color);
lastX = window_start_x;
lastY = y;
}
return x;
}工程验证
在 empty.c 文件中写入以下代码:
#include "ti_msp_dl_config.h"
#include "mid_debug_led.h"
#include "mid_debug_uart.h"
#include "string.h"
#include "stdio.h"
#include "hw_lcd.h"
#include "mid_button.h"
#include "app_key_task.h"
#include "hw_encoder.h"
#include "mid_timer.h"
#include "app_ui.h"

#include <stdlib.h> //随机数使用

// 生成范围在 0 到 88 之间的随机整数
int generate_random(void)
{
	return (rand() % 89);
}

int main(void)
{

	int sys_time = 0;

	SYSCFG_DL_init();

	//DEBUG串口初始化
	debug_uart_init();

	//按键任务初始化
	user_button_init();

	//编码器初始化
	encoder_init();

	//定时器初始化
	timer_init();

	//LCD初始化
	lcd_init();

	//LCD显示UI
	ui_home_page();

	//暂停2秒
	delay_cycles(80000000*2);

	//显示定速界面
	ui_speed_page();
	//显示定速界面的PID参数
	ui_speed_page_value_set(12.1, 2.2, 3.12, 50, 30, 1);
	//I值位置显示选择框
	ui_speed_page_select_box(1);
	//D值位置显示选中框
	ui_parameter_select_box_bold(2);

	while (1)
	{
		sys_time++;

	if( sys_time % 10 == 0 )//2*10=20ms刷新一次屏幕
	{
		//使用随机数刷新波形
		draw_speed_curve(0, 0, 319, 88, GREEN, BLACK, generate_random() );
	}

		delay_cycles(CPUCLK_FREQ / 1000 * 2);//时间基准2ms
	}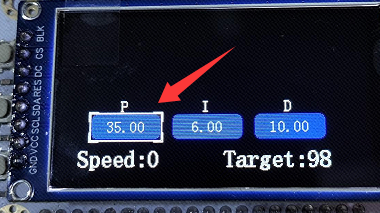
}效果:
代码下载
下载地址:
https://gitee.com/lcsc/easy-pid-beginner-kit/tree/master/examples/Keil/06_ui_display